
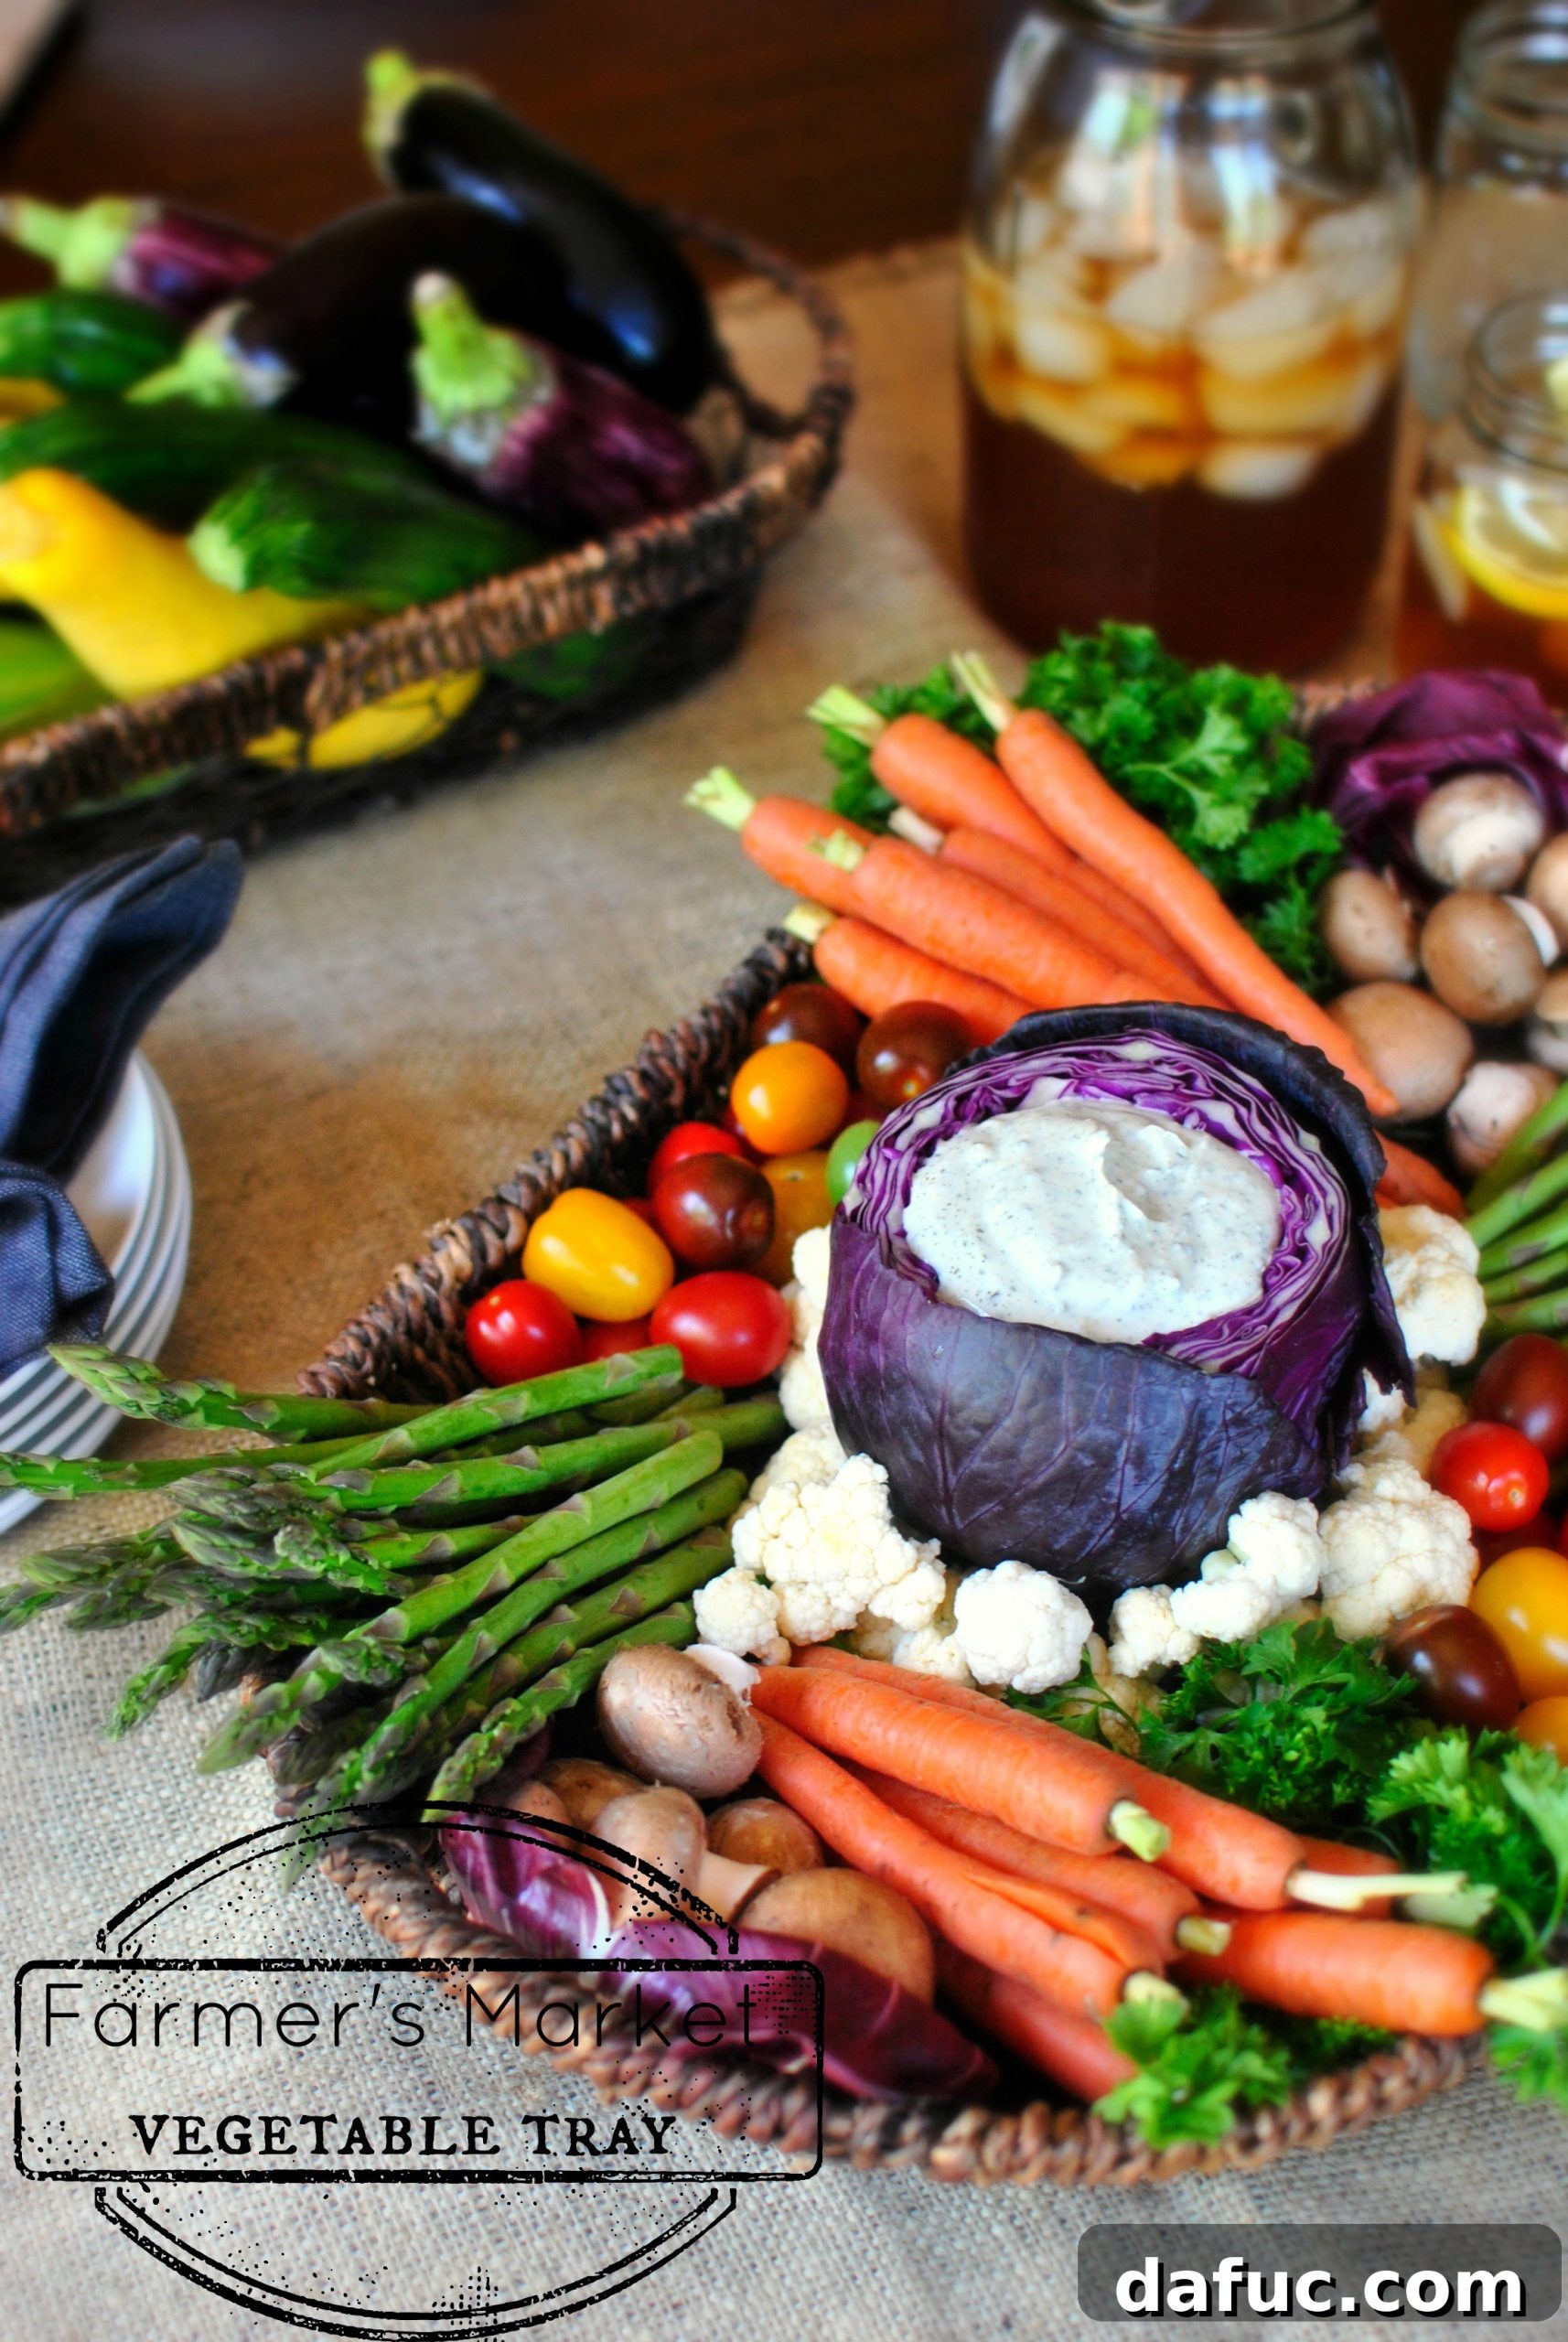
Transform your next gathering with a breathtaking Farmers Market Vegetable Tray! Forget the mundane pre-packaged platters; this guide will show you how to assemble a vibrant, fresh, and irresistibly appealing crudités display that will not only tantalize taste buds but also serve as a stunning edible centerpiece. It’s surprisingly simple to create, packed with nutrition, and guaranteed to be a conversation starter at any party or get-together.
Elevate Your Entertaining: Why a Farmers Market Veggie Tray?
In a world of quick fixes and store-bought shortcuts, taking a moment to craft something beautiful and wholesome truly stands out. A farmers market-inspired vegetable tray isn’t just about food; it’s about celebrating freshness, color, and the simple joy of healthy eating. Imagine a platter overflowing with the season’s best produce, arranged with an artistic touch, and anchored by a unique, edible dip bowl. It speaks volumes about your care as a host and your appreciation for quality ingredients.
Whether you’re hosting a casual backyard barbecue, a sophisticated dinner party, or simply need a show-stopping dish to bring to a potluck, this elevated veggie tray is the perfect solution. It caters to a variety of dietary preferences, offers a refreshing contrast to heavier party foods, and provides a guilt-free snacking option that everyone will love.
Curating Your Colorful Canvas: Selecting the Perfect Produce
Creating an exceptional vegetable platter is much like arranging a beautiful bouquet of flowers. The key lies in selecting a diverse range of colors, textures, and shapes to create visual interest and a harmonious spread. Think beyond the usual carrots and celery sticks. Stroll through your local farmers market or the produce aisle with an eye for variety and vibrancy. Aim for a spectrum of colors:
- **Reds:** Cherry tomatoes (various hues!), red bell peppers, radishes.
- **Purples/Blues:** Purple carrots, purple cabbage (perfect for our dip bowl!), red onion slices, blackberries (for garnish, if desired).
- **Oranges/Yellows:** Orange bell peppers, yellow bell peppers, baby carrots, orange or yellow cherry tomatoes.
- **Greens:** Asparagus spears, sugar snap peas, broccoli florets, cucumber slices, green bell peppers, fresh parsley or dill for garnish.
- **Whites/Neutrals:** Cauliflower florets, mushrooms, jicama sticks.
The beauty of a “farmers market” theme is its embrace of seasonality. Choose vegetables that are at their peak freshness and flavor. Don’t be afraid to mix and match; the more variety, the more enticing your platter will be. Remember to wash and trim all your chosen vegetables thoroughly, preparing them for immediate enjoyment. Cut larger vegetables into bite-sized, dippable pieces.
Setting the Stage: Choosing Your Platter and Preparing Ingredients
The vessel for your vegetable masterpiece is just as important as the vegetables themselves. To truly capture that rustic, farm-fresh charm, opt for a platter that evokes a natural aesthetic. A woven basket, like the one I’ve used, instantly adds to the farmers market vibe, creating a sense of abundance and warmth. Other excellent choices include large wooden boards, rustic ceramic platters, or even a simple, oversized white dish that allows the colors of the vegetables to truly pop.
Before you begin assembling, ensure all your chosen produce is meticulously washed, scrubbed, or trimmed. This step is crucial for hygiene and presentation. For instance, asparagus ends should be snapped off, broccoli and cauliflower cut into neat florets, and carrots peeled if preferred. Having all your ingredients prepped and ready will make the assembly process smooth and enjoyable.
The Edible Centerpiece: Crafting a Stunning Cabbage Dip Bowl
One of the most impressive and charming elements of this farmers market vegetable tray is the DIY cabbage dip bowl. It’s an ingenious idea I discovered on Pinterest, offering a natural and beautiful alternative to traditional dip containers. While the original inspiration lacked detailed instructions, I’ve refined the process into easy-to-follow steps. This edible bowl not only holds your dip but also contributes to the overall rustic aesthetic, making your platter truly unique.
Step-by-Step Guide to Your Cabbage Dip Bowl:
1. **Prepare the Base:** Begin by trimming off the majority of the root end of your cabbage. The goal is to create a flat, stable base so the cabbage head sits securely on your platter without wobbling. Be careful to leave enough of the core intact so the outer leaves remain connected to the head.
2. **Reserve Outer Leaves:** Gently peel away a few of the larger, prettier outer leaves of the cabbage. These frilly leaves will be used later for decorative purposes, creating the illusion that your cabbage has just been plucked from the garden. Set them aside carefully to avoid tearing.
3. **Create the Opening:** With a sharp chef’s knife, carefully slice off the top portion of the cabbage head. You want to expose the dense inner layers, creating a wide enough opening for your dip but leaving plenty of cabbage intact to form the bowl’s walls. Aim for a cut that’s roughly one-quarter to one-third down from the top.
4. **Outline the Cavity:** Using a smaller paring knife, make an “X” incision within the exposed inner cabbage. This will help loosen the core and make hollowing easier. Ensure you leave a few outer layers untouched to maintain the structural integrity of your dip bowl. Do not cut all the way through the bottom or sides.
5. **Scoop Out the Core:** Now, take a sturdy spoon and begin to hollow out the center of the cabbage. Scoop out the cut sections and any loosened leaves, gradually creating a bowl-shaped cavity. Leave about an inch or so of cabbage wall thickness to ensure it’s robust enough to hold your dip without leaking. The scooped-out cabbage can be saved for other recipes, like coleslaw or stir-fries.
This clever method transforms a simple vegetable into a functional and beautiful serving piece. The result is a truly “cool” and rustic dip holder!
6. **Decorative Touch:** Remember those pretty outer leaves you saved earlier? Now’s the time to use them. Arrange these leaves artfully around the base of your hollowed-out cabbage head on the platter. This creates a natural, organic look, mimicking a cabbage that has just been pulled from the ground, ready to be enjoyed. Adjust them as needed to create a full, inviting presentation.
Assembling Your Stunning Farmers Market Vegetable Tray
With your cabbage dip bowl prepared, it’s time for the fun part: arranging the vegetables! This is where you can let your creativity shine, building a visually appealing and easy-to-access display. Think about balance, contrast, and creating an abundant, overflowing appearance.
Strategic Placement for a Breathtaking Display:
1. **Anchor with the Cabbage:** Begin by centering your magnificent cabbage dip bowl on your chosen platter. This will be the focal point of your entire display.
2. **Build the Foundation:** Strategically place larger, sturdier vegetables around the base of the cabbage dip bowl. Cauliflower florets are perfect for this, creating a “cloud” around the dip that offers both visual appeal and practical support for other vegetables.
3. **Introduce Variety and Color:** Now, start filling in the empty spaces with your colorful array of prepared vegetables. Group similar colors or textures together for impact, or intersperse them to create a mosaic effect. Consider:
- **Leafy Delights:** Tuck in bundles of fresh parsley and radicchio. The deep red of radicchio provides a beautiful contrast to green herbs and other vegetables.
- **Crunchy Goodness:** Arrange vibrant carrot sticks, cucumber slices, and celery stalks in appealing clusters.
- **Juicy Bites:** Scatter cherry tomatoes (red, yellow, orange!) throughout the platter. Their spherical shape and bright colors add pops of freshness.
- **Earthy Selections:** Artfully place blanched asparagus spears and whole mushrooms.
4. **Layer and Elevate:** Don’t just lay vegetables flat. Arrange some vertically, create small “hills” with others, and layer them slightly to give your platter depth and volume. This mimics the overflowing bounty of a true farmers market stall.
5. **The Finishing Touch: The Dip:** Last but certainly not least, spoon your chosen dip into the hollowed-out cabbage bowl. A creamy, rich dip contrasts beautifully with the crisp freshness of the vegetables. Consider a classic ranch, a tangy dill dip, a vibrant hummus, or even a spicy avocado crema. Fill in any remaining small gaps with extra fresh herbs like dill sprigs or small lettuce leaves to make the platter look truly abundant and complete.
Tips for Success and Beyond
- **Prep Ahead:** Most of the vegetable prep can be done a day in advance. Wash, chop, and store vegetables in airtight containers in the refrigerator. Assemble the platter just an hour or two before serving for optimal freshness.
- **Keep it Chilled:** If serving outdoors or in warm conditions, place your platter on a bed of ice or use chilled serving dishes to keep the vegetables crisp and fresh.
- **Add More Dipping Options:** While the cabbage bowl is fantastic, you can also include a small bowl or two of complementary dips on the side for guests who prefer more variety.
- **Include Non-Veggie Dippers:** For added appeal, offer a small selection of crackers, artisanal breadsticks, or pretzel thins alongside your vegetables.
- **Seasonal Variations:** Adapt your vegetable choices to the season. In summer, think colorful bell peppers, zucchini, and snap peas. In fall, consider radishes, endive, and purple carrots.
- **Kid-Friendly Touches:** If children are attending, include some of their favorite easy-to-munch vegetables like cucumber slices, baby carrots, and bell pepper strips.
And POOF! Just like that, you have a cool, colorful, and utterly delicious veggie tray that’s far from ordinary. It’s a testament to simple ingredients transformed into something extraordinary, proving that healthy eating can also be incredibly stylish and fun.
Enjoy! We hope this guide inspires you to create your own beautiful Farmers Market Vegetable Tray. If you give this recipe a try, don’t forget to let us know! Snap a photo and tag us on Twitter or Instagram!
Print Recipe
Pin Recipe
Leave a Review »
Farmers Market Vegetable Tray
This farmers market vegetable tray will look great at any party or get together. This post shows you just how easy it is to pull together.
Ingredients
- 1 small red cabbage
- 2 cups cauliflower florets
- 1 small radicchio
- 1 bunch asparagus
- 1 pint cherry tomatoes
- 8 ounces mushrooms
- 1 bunch parsley
- Your favorite vegetable dip
Instructions
- Trim off the majority of the root-end of the cabbage so it sits flat, ensuring the leaves remain intact. Carefully remove and save a few tough outer leaves.
- With a sharp knife, slice off the top portion of the cabbage, exposing the inside. Using a paring knife, make an “X” incision in the center, being careful to leave a few outer layers untouched to maintain the bowl’s structure.
- Use a spoon to hollow out the center of the cabbage, creating a bowl.
- Place the reserved outer leaves under the hollowed cabbage on your serving platter to mimic a cabbage freshly pulled from the ground, adjusting for a natural look.
- Center the prepared cabbage head on your tray.
- Strategically place cauliflower florets around the base of the cabbage dip bowl, forming a soft foundation.
- Fill in all remaining empty spaces with the radicchio, carrots, asparagus, tomatoes, mushrooms, and parsley. Arrange them artfully, considering color and texture to create an abundant display.
- Just before serving, fill the cabbage bowl with your dip of choice.
Nutrition Information
Serving: 1g, Calories: 25kcal, Carbohydrates: 5g, Protein: 2g, Fat: 1g, Saturated Fat: 1g, Polyunsaturated Fat: 1g, Monounsaturated Fat: 1g, Sodium: 18mg, Potassium: 270mg, Fiber: 2g, Sugar: 3g, Vitamin A: 844IU, Vitamin C: 32mg, Calcium: 29mg, Iron: 1mg