
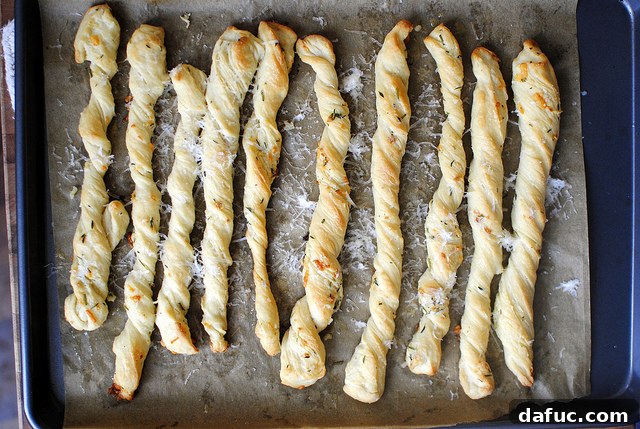
Welcome to the ultimate guide for creating irresistible Garlic Herb Breadsticks right in your own kitchen! Forget store-bought versions; these homemade breadsticks are a game-changer, bursting with fresh flavors and boasting a delightful texture that perfectly complements any meal. Imagine soft, pillowy dough infused with aromatic garlic and herbs, baked to a golden crisp perfection. They are not just a side dish; they are a culinary experience designed to gather every last drop of your favorite pasta sauce.
There’s something incredibly satisfying about baking bread from scratch, and these breadsticks are no exception. The process is enjoyable, the aroma that fills your home is intoxicating, and the end result is a warm, savory treat that will have everyone reaching for more. Whether you’re a seasoned baker or just starting your journey into the world of homemade bread, this recipe is designed to be straightforward and rewarding.
Why Homemade Garlic Herb Breadsticks?
Beyond the sheer joy of baking, opting for homemade breadsticks offers numerous advantages. You have complete control over the ingredients, ensuring freshness and quality. No mysterious additives or preservatives here! You can customize the herb blend to suit your palate, adding more rosemary for an earthy note or extra thyme for a subtle lemon hint. The flavor profile of fresh garlic and herbs simply cannot be replicated by pre-packaged alternatives.
These breadsticks are more than just a delicious accompaniment; they are the ideal tool for savoring every bit of a rich marinara, a creamy alfredo, or a hearty meat sauce. Their slightly crispy exterior gives way to a tender, fluffy interior, making them perfect for soaking up sauces. Prepare to guard your plate, because once your family and friends taste these, they’ll be vying for the last one!
Essential Ingredients for Your Garlic Herb Breadsticks
Creating these divine breadsticks starts with a few simple, high-quality ingredients. Most of these are likely already staples in your pantry. Here’s what you’ll need to bring this magic to life:
For the Dough:
- Good quality bread flour
- Warm water (crucial for yeast activation)
- Active dry yeast
- A touch of honey (to feed the yeast and add subtle sweetness)
- Olive oil (for flavor and texture)
- Kosher salt (for seasoning the dough)
For the Flavorful Herb Butter Topping:
- Unsalted butter (softened for easy mixing)
- Fresh rosemary (minced)
- Fresh thyme (minced)
- Fresh garlic (pressed or finely minced)
- Parmesan cheese (grated for a savory, salty kick)
- Kosher salt (to enhance the flavors)
Using fresh herbs and garlic makes an enormous difference in the final taste of your breadsticks. The vibrant aromas and robust flavors are what truly elevate this recipe from good to unforgettable. Don’t skimp on these!

Crafting the Perfect Dough: Step-by-Step
The foundation of any great breadstick is a well-made dough. This process is straightforward and incredibly rewarding. Let’s get started!
Activating the Yeast
In a liquid measuring cup or a small bowl, combine two teaspoons of honey with 1¾ cups of warm water. The water temperature is critical here; it should be between 110-115°F (43-46°C). Too cold, and the yeast won’t activate; too hot, and you’ll kill it. Stir in one packet (2¼ teaspoons) of active dry yeast. Give it about five to ten minutes. You’ll know your yeast is alive and well when a foamy layer forms on the surface – this is its “yeasty magic” at work!

Once the yeast is bubbly, add two tablespoons of olive oil to the mixture and stir gently. Set this liquid aside.
Mixing the Dry Ingredients
In the bowl of your stand mixer, fitted with the paddle attachment, measure out four cups of good quality bread flour. Bread flour has a higher protein content, which contributes to a chewier, more structured breadstick. Add two teaspoons of kosher salt and give the dry ingredients a quick stir to ensure the salt is evenly distributed.
Bringing the Dough Together
With the mixer on a low speed, slowly stream in the liquid yeast mixture. Use a spatula to scrape every last bit of liquid from your measuring cup. Mix just until the ingredients start to come together and form a shaggy dough. At this point, switch from the paddle attachment to the dough hook.

Continue mixing on medium-low speed for about 2-3 minutes. The dough should begin to pull away from the sides of the bowl. It will be slightly sticky, which is perfectly normal for this recipe. If you find it excessively wet, you can sprinkle in a little more bread flour, one tablespoon at a time, until it reaches the right consistency.
Hand Kneading for Perfection
Turn the dough out onto a well-floured surface. Knead it by hand for another 2-3 minutes. This final kneading helps develop the gluten further, resulting in a more elastic and tender breadstick. You’ll know it’s ready when the dough becomes smooth and elastic, and perhaps takes on a slightly wrinkled appearance, as a seasoned baker might describe it!

The First Rise
Lightly oil a clean bowl. Transfer the kneaded dough to the oiled bowl, turning it once to ensure all sides are coated. This prevents the dough from sticking and drying out. Cover the bowl with a clean tea towel and place it in a warm, draft-free spot. Let the dough rise for approximately 40 minutes, or until it has visibly doubled (or even tripled!) in size. This proofing stage allows the yeast to work its magic, creating air pockets that contribute to the breadsticks’ light and airy texture.

Crafting the Flavorful Herb Butter Topping
While your dough is happily rising, it’s the perfect time to prepare the aromatic garlic herb butter that will infuse your breadsticks with incredible flavor.
Preparing the Herbs and Garlic
Finely chop enough fresh rosemary and thyme to yield one tablespoon of each. Fresh herbs are paramount here; their vibrant flavors will truly shine. For the garlic, press two cloves through a garlic press or mince them very finely. The goal is to distribute the garlic flavor evenly throughout the butter.

Mixing the Herb Butter
In a small bowl, combine ½ cup of softened unsalted butter with the minced rosemary, minced thyme, pressed garlic, ¼ cup of grated Parmesan cheese, and 1 teaspoon of kosher salt. Use a fork or a small spatula to mix everything together until it’s thoroughly combined and appears uniform. This mixture is a powerhouse of flavor that will transform your breadsticks.

Shaping and Baking Your Irresistible Breadsticks
Now comes the fun part: shaping your dough into beautiful breadsticks and watching them bake to golden perfection!
Preparing the Dough for Shaping
Once your dough has completed its first rise, gently remove the tea towel. You’ll notice it’s significantly larger and beautifully airy. Now, it’s time to “deflate this sucker” by punching it down gently with your hands or fist. This expels the trapped gases and makes the dough easier to work with.
.jpg "Savory Garlic Herb Breadsticks 10")
Transfer the dough to a well-floured surface. Using your fingers or a rolling pin, gently stretch and press the dough out into a large rectangle. Aim for an even thickness across the entire surface.
Spreading the Herb Butter
Take three-quarters of your prepared garlic herb butter mixture and spread it evenly over the surface of the dough rectangle. Ensure it covers from edge to edge, as this is where much of the flavor will come from. Set the remaining quarter of the herb butter aside; you’ll melt it later for a final brush.

Cutting and Shaping
To make the cutting process easier and to achieve uniform strips, fold the dough in half lengthwise. Then, using a sharp knife or a pizza cutter, cut the folded dough into approximately twelve even strips. Each strip should be about an inch wide.

Now, take each folded strip, open it up, and cut it in half in the middle to create two thinner, longer pieces. This technique helps ensure your breadsticks are of a manageable size and bake evenly.

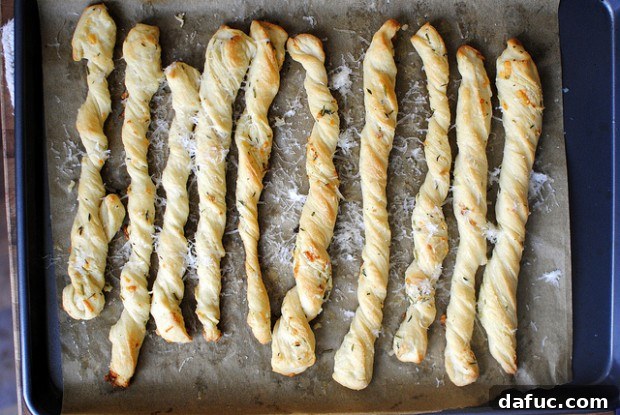
You have two fun options for shaping your breadsticks: knots or twists. For knots, simply tie each strip into a loose knot, tucking the ends underneath. For twists, gently twist each strip into a spiral shape. Both methods create delicious breadsticks; the choice is yours!


Arrange your shaped breadsticks on a baking sheet lined with parchment paper, leaving a little space between each one.
Baking and Finishing Touches
Preheat your oven to 375°F (190°C). While the oven heats, melt the remaining one-quarter of the herb butter mixture in a small saucepan over low heat. This will be your secret weapon for the ultimate finishing touch.
Bake the breadsticks in the preheated oven for 15 to 20 minutes, or until they are beautifully golden brown and cooked through. Keep a close eye on them, as oven temperatures can vary.
As soon as you remove the hot breadsticks from the oven, immediately brush them generously with the melted herb butter. This creates an extra layer of garlicky, herby goodness and a lovely sheen. Finish by sprinkling a little extra grated Parmesan cheese over the top for an irresistible salty crunch.

Serve these garlic herb breadsticks warm. The combination of crispy edges, soft centers, and the intense flavor of garlic, herbs, and Parmesan is simply divine. Whether you opt for knots or twists, this recipe is incredibly forgiving and yields truly spectacular results.
Serving Suggestions & Pairings
While these breadsticks are a match made in heaven for pasta dishes, their versatility extends far beyond! Here are a few ideas to get your culinary creativity flowing:
- Classic Pasta Companion: The absolute best way to enjoy these is alongside a hearty bowl of spaghetti and meatballs, lasagna, or chicken alfredo. They’re perfect for scooping up any lingering sauce.
- Soup & Salad Side: Elevate a simple bowl of tomato soup or a fresh garden salad with these flavorful breadsticks. They add substance and a burst of savory taste.
- Appetizer Perfection: Serve them as a standalone appetizer with an extra bowl of marinara or a creamy garlic dip. They’re a crowd-pleaser for any gathering.
- Breakfast Twist: Believe it or not, these can be a delightful savory addition to a brunch spread, especially if paired with eggs or a frittata.
- Garlic Bread Alternative: Why settle for plain garlic bread when you can have these flavorful, shapely breadsticks? They bring more flair to the table.
Tips for Perfect Breadsticks Every Time
- Accurate Water Temperature: As mentioned, yeast is finicky. Use a thermometer to ensure your water is in the sweet spot (110-115°F / 43-46°C) for activation.
- Don’t Over-Flour: While a well-floured surface is good for kneading, adding too much extra flour can make your breadsticks dense and dry. Aim for a dough that is slightly sticky but manageable.
- Fresh Herbs are Key: The difference between fresh and dried herbs in this recipe is significant. Invest in fresh rosemary and thyme for the best flavor.
- Even Spreading: Ensure the herb butter is spread evenly across the dough rectangle. This guarantees every bite is packed with flavor.
- Parchment Paper: Lining your baking sheet with parchment paper prevents sticking and makes cleanup a breeze.
- Adjust Baking Time: Ovens vary, so keep an eye on your breadsticks during the last few minutes of baking. They should be golden brown, not burnt.
- Serve Warm: While still delicious cooled, these breadsticks are at their absolute best when served fresh from the oven, brushed with melted butter.
Conclusion: Your New Favorite Side Dish Awaits!
Making these homemade Garlic Herb Breadsticks is a rewarding culinary journey that results in a truly spectacular and versatile side dish. The soft, airy dough, coupled with the rich, aromatic garlic and herb butter, creates an unforgettable flavor and texture experience. They are perfect for soaking up pasta sauces, accompanying soups, or simply enjoying on their own. Don’t be intimidated by working with yeast; this recipe is designed for success, even for beginner bakers.
So, gather your ingredients, clear your schedule for some delightful baking, and prepare to impress yourself and your loved ones with these incredibly delicious breadsticks. Once you try them, you’ll find yourself reaching for this recipe again and again!
Enjoy! And when you bring these Garlic Herb Breadsticks to life in your kitchen, we’d love to see your creations! Snap a photo and share it on your favorite social media platforms, tagging us so we can celebrate your baking success!

Garlic Herb Breadsticks Recipe
These homemade garlic herb breadsticks are incredibly flavorful and perfect for any meal, especially with pasta.
- Yield: 12 servings
- Prep Time: 1 hour
- Cook Time: 15 minutes
- Total Time: 1 hour 15 minutes
- Author: Laurie McNamara
- Course: Breads & Baked Goods
- Cuisine: Italian
Ingredients
For the Dough:
- 4 cups bread flour, plus more for kneading
- 1¾ cup warm water, 110-115 degrees F
- 2¼ teaspoon active dry yeast
- 2 teaspoons honey
- 2 tablespoons olive oil, plus more for oiling bowl
- 2 teaspoons kosher salt
For the Breadsticks:
- 1/2 cup unsalted butter, softened at room temperature
- 1/4 cup grated Parmesan cheese
- 1 tablespoon minced fresh thyme
- 1 tablespoon minced fresh rosemary
- 2 cloves garlic, pressed or finely minced
- 1 teaspoon kosher salt
Instructions
Make the Dough:
- In a liquid measuring cup or small bowl, combine honey and warm water. Stir in the active dry yeast. Let this mixture sit for 5 to 10 minutes until foamy, indicating the yeast is active.
- Add two tablespoons of olive oil to the yeast mixture and stir gently.
- In the bowl of a stand mixer fitted with the paddle attachment, measure 4 cups of bread flour and two teaspoons of kosher salt. Stir briefly to combine these dry ingredients.
- With the mixer on low, gradually stream in the liquids. Use a spatula to get it all out of the cup. Mix just until combined and then switch to your bread hook. You could knead this by hand but it would take 6-8 minutes. Turn the mixer back on to medium-low and let it go for 3-4 minutes or until the dough pulls away from the sides.
- Turn out the dough onto a well floured surface and continue to knead for 3-4 more minutes.
- Place the dough into a well oiled bowl and toss it to coat. Cover with a tea towel and stick it in a warm, dry place for 40 minutes.
Assemble and Bake the Breadsticks:
- While the dough is rising, make the herb butter. Add softened butter, minced herbs, garlic, 1/4 cup of the grated Parmesan and salt into a small bowl. Mix well.
- After the time is up, punch it down and stretch it into a rectangle. Spread 3/4 of the butter over top of the rectangle. Place the remaining butter in a small saucepan and heat over low to melt. Fold the dough in half lengthwise and then cut in half. Cut into twelve even strips. Open each strip and cut in half at the middle. Tie in a knot, tucking the ends under OR twist into breadsticks.
- Bake in a preheated 375° degree oven for 15 to twenty minutes. Remove brush with melted herb butter and sprinkle with a little remaining Parmesan. Serve warm.
Nutrition Information
- Serving Size: 2g
- Calories: 260kcal
- Carbohydrates: 33g
- Protein: 7g
- Fat: 11g
- Saturated Fat: 6g
- Polyunsaturated Fat: 1g
- Monounsaturated Fat: 4g
- Trans Fat: 1g
- Cholesterol: 22mg
- Sodium: 232mg
- Potassium: 75mg
- Fiber: 2g
- Sugar: 1g
- Vitamin A: 286IU
- Vitamin C: 1mg
- Calcium: 41mg
- Iron: 1mg