
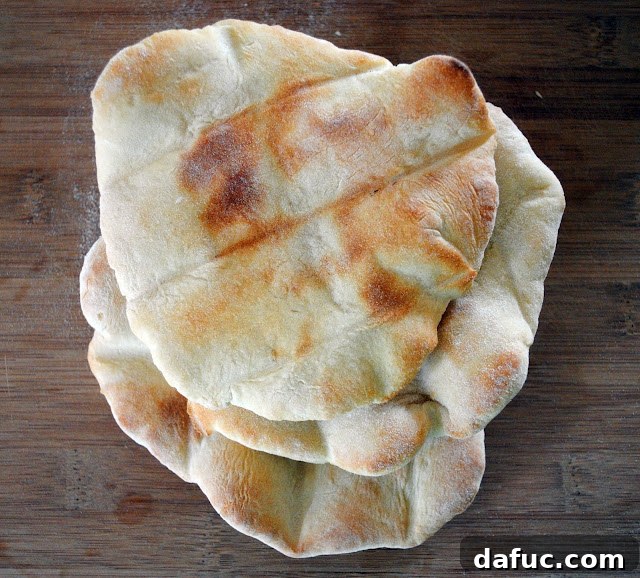
Why settle for store-bought when the aroma of freshly baked, warm pita bread can fill your kitchen? Making delicious homemade rustic pita bread is surprisingly easy and incredibly rewarding. Get ready to flip over how simple and satisfying it is to create your own authentic pita pockets right in your home!
The Rewarding Journey of Baking Homemade Rustic Pita Bread
Every culinary adventure has its unique starting point, and for me, today’s decision to tackle homemade pita bread began with an unexpected twist. I initially planned to put my new KitchenAid mixer to good use, envisioning effortless dough preparation. However, fate had other plans. This morning, my shiny new mixer endured an impromptu lime green wax shower when a lit, three-wick candle had a rather dramatic fall nearby. The vibrant wax splashed everywhere – on the attachments, the base, and even my walls. For a moment, I thought my new kitchen companion was ruined! Thankfully, with a bit of elbow grease, it was cleaned, and the baking spirit, though momentarily dampened, reignited, setting the stage for a delightful baking journey.
Overcoming the Intimidation of Yeast Baking
For many years, the mere thought of baking bread, especially anything involving yeast and the dreaded “rising” part, filled me with a sense of apprehension. It wasn’t exactly fear, but certainly intimidation. The idea of coaxing yeast to perform its magic, worrying about precise temperatures, and patiently waiting for dough to double in size felt like a mysterious, complex science best left to professional bakers. Don’t laugh – if you’ve ever felt this way, you know it’s a real mental block, preventing many from exploring the immense joy of homemade bread.
My perspective shifted dramatically a couple of years ago when my mom and I ventured into making pizza dough together. It was then that I realized the incredible simplicity behind the process. The “magic” of baking isn’t an impenetrable secret; it’s a series of manageable steps that yield incredible results. There’s truly nothing quite like the intoxicating aroma of yeasty dough. It’s that distinctive, comforting smell you encounter when walking into a Subway, where freshly baked bread scents the air. For me, that’s what heaven must smell like, a promise of warmth and deliciousness that beckons you into the kitchen.
Embarking on Your Homemade Pita Adventure
Despite my initial hesitation, a mere thirty minutes of internal debate later, I surrendered to the call of homemade pita bread. And I’m so glad I did! The process, as I soon discovered, is less daunting and far more enjoyable than I ever imagined. It transforms basic, humble ingredients into something truly special – a versatile, fluffy bread perfect for countless meals and culinary creations. If I can overcome my fear and bake perfect pita, so can you!
Essential Ingredients for Rustic Pita Bread
To embark on your own homemade pita bread journey, you’ll be pleased to know you need just a few staple ingredients, most of which are likely already in your pantry. The beauty of this recipe lies in its simplicity and accessibility, proving that extraordinary flavors often come from the most basic components. Gather these items, and you’re well on your way to creating delightful, authentic pita pockets:
- Unbleached All-Purpose Flour: This forms the essential structure of our pita, contributing to its chewy texture and overall body. While bleached flour can work, unbleached often offers a slightly better texture and flavor profile.
- Granulated Sugar: A small amount of sugar acts as food for the yeast, helping to activate it and ensuring a robust rise. It also adds a subtle sweetness that balances the savory notes of the bread.
- Kosher Salt: More than just a seasoning, salt is crucial for enhancing the flavor of the dough, providing balance, and even playing a role in regulating yeast activity.
- Active Dry Yeast: The powerhouse ingredient responsible for the bread’s lift, its airy texture, and, most importantly, the creation of those characteristic internal pockets that make pita so unique.
- Warm Water: The ideal temperature is key here. Warm water (around 105-115°F or 40-46°C) activates the yeast without killing it, providing the necessary moisture to bring the dough together.
- Olive Oil: Beyond adding a subtle, Mediterranean-inspired flavor, olive oil contributes to the dough’s tenderness, elasticity, and helps create a soft, supple pita. You’ll also need a little extra for coating the bowl during rising.
The Art and Science of Dough Preparation
Activating the Yeast: The Bloom of Life
The first step in our pita bread recipe is truly fascinating to watch and is a critical indicator of success. In a warm bowl, you’ll combine warm water and a touch of granulated sugar, then gently sprinkle your active dry yeast over the surface. What happens next is pure kitchen magic, an exciting precursor to your homemade rustic pita: the yeast begins to “bloom.” It transforms from tiny, dormant granules into a frothy, bubbly, sponge-like foam, expanding visibly before your eyes. This active, bubbly stage, usually taking about 10 minutes, is absolutely crucial as it confirms your yeast is alive and active, fully ready to leaven your bread and create those signature pockets.
This blooming stage always brings back fond memories of my home economics class, specifically when we’d make those wonderfully soft pretzels. There’s a distinct, earthy, yet pleasant aroma that fills the air during this time – a testament to the power of fermentation and the promise of deliciousness. I loved home-ec for these practical skills, though I confess, sewing was never my strong suit! But baking, now that’s a truly timeless skill that continually brings joy.
Kneading for Perfection: Developing the Gluten Structure
Once your yeast has happily bloomed, showing off its lively froth, it’s time to introduce the remaining heroes: the unbleached all-purpose flour, fragrant olive oil, and the kosher salt. Gently stir them into the yeast mixture until a shaggy, somewhat crumbly dough forms, then turn it out onto a lightly floured surface for the essential step of kneading. This is where you truly connect with your bread-making process, transforming disparate ingredients into a cohesive, elastic dough.
Be warned: kneading is a wonderfully tactile, often messy business! A crucial piece of advice I learned the hard way: if you wear rings, especially wedding rings with intricate designs, take them off beforehand. Otherwise, you’ll spend a considerable amount of time meticulously cleaning dough particles from every tiny nook and cranny – a frustrating task I’ve certainly undertaken once or twice! Kneading should continue until the dough transforms from a sticky mess into a soft, elastic ball that’s barely tacky to the touch. This active working of the dough develops the gluten, creating a strong, pliable network that is absolutely essential for giving pita bread its characteristic chew and, most importantly, its ability to puff up majestically and form those coveted internal pockets during baking.
The First Rise: Patience Unleashes Flavor and Texture
After a good, vigorous kneading session, your smooth, elastic dough is ready for its first, crucial rest. Place it into a lightly oiled bowl, turning it once to ensure it’s fully coated. Then, cover the bowl with a warm, damp towel and transfer it to a warm, draft-free spot. Your oven, turned off but slightly warm from a previous use, or simply a sunny spot on your kitchen counter, works perfectly. This is where the magic of the yeast truly takes over, causing the dough to undergo its primary fermentation and double beautifully in size, typically within an hour. This rising period not only increases the dough’s volume but also develops complex flavors.
I distinctly remember this stage one afternoon. As I placed the dough to rise, I had to dash out to pick up my girls from the bus stop. Walking back into the house, a faint, sweet, yeasty aroma greeted us – a subtle yet intoxicating promise of the deliciousness to come. It was utterly amazing and instantly filled me with excitement for the next steps in creating our homemade pita pockets, a feeling of anticipation that only home baking can truly provide.
Shaping and Rolling Your Pita Bread
Dividing the Dough Evenly for Consistent Pitas
Once the dough has beautifully doubled in size, exhibiting a light, airy texture, gently punch it down to release the accumulated gases. Turn it out onto a lightly floured surface. Now comes the task of dividing it into even pieces. The “old me,” the one intimidated by bread baking, would have just haphazardly started cutting, hoping to magically end up with the right number of pieces the recipe called for. But experience teaches clever tricks! Instead, roll the dough into a uniform 12-inch log, then divide it in half, then half again, and so on, until you have eight relatively even pieces. Don’t worry if they’re not perfectly identical – the rustic, homemade charm is part of the appeal, and minor variations are entirely acceptable!
Forming the Balls and the Crucial Rest for the “Pocket”
Next, take each dough piece and roll it into a smooth, tight ball. This step is absolutely crucial for creating those signature pita pockets that make this bread so versatile and enjoyable. The recipe emphasized that without proper ball formation, the air wouldn’t accumulate efficiently in the center, preventing the characteristic puff during baking. While the exact science behind how these pockets form feels like pure magic, trust the process – these little dough balls are the secret to the perfect “pocket” when you slice your pita in half. Cover these balls with a damp towel and let them rest for about 10-15 minutes. This vital resting period allows the gluten to relax significantly, making the dough much easier to roll out thinly and evenly in the next step.
Rolling Out the Rounds: With a Little Help from Gertrude
Now, it’s time to bust out the rolling pin! Mine is affectionately named Gertrude (or sometimes Wilma) – she’s a ginormous, slightly awkward beast of a kitchen tool that doesn’t quite fit in any drawer, but I wouldn’t trade her for anything. She makes quick work of rolling out pie crusts, and occasionally, with a playful spirit, threatening my kids (just kidding, of course! Kitchen equipment should only be used for culinary delights – anything else would be a crime against all things kitchen-y!).
Take one dough ball at a time, keeping the others covered with a damp towel to prevent drying, and roll it out into a thin, approximately 7-inch diameter circle. The key here is to aim for an even thickness throughout the round. This is where it can get a bit tricky; you want it thin enough to puff up beautifully but not so thin that it becomes fragile, tears easily, or falls through the oven racks. It often feels like a delicate balancing act, requiring a light touch and a steady hand. My eyeballs aren’t always the most precise measurement tools, as evidenced by my slightly unequal pita rounds, but that’s perfectly fine! The rustic charm is part of the homemade experience, and minor imperfections only add to its character. Just keep pushing through – envisioning charred dough scraped off the oven floor is definitely not the destiny of your delicious homemade pita!
Preventing Sticking: A Simple Floury Secret
As you meticulously roll out your pita rounds, it’s wise to lightly dust each one with a bit of extra flour. This simple yet vital step is crucial to prevent them from sticking to each other as you stack them, patiently waiting their turn for the scorching heat of the oven. A little bit of flour goes a long way in ensuring a smooth and frustration-free baking process, keeping your beautifully shaped dough rounds intact until they hit the heat.
Baking Your Perfect Pita Pockets
The Moment of Truth: Into the Hot Oven!
Now for the grand finale! Preheat your oven to a blazing 500 degrees Fahrenheit (260°C). This extremely high heat is absolutely crucial for the pita to puff rapidly and dramatically, creating that iconic pocket structure. Place one or two rolled-out pita rounds directly onto a hot oven rack or a preheated baking stone. Watch closely – this is where the true magic happens and the anticipation builds!
In just 4-5 minutes, sometimes even less, you’ll witness your flat dough rounds undergo an astonishing transformation. They’ll puff up dramatically in the center, swelling into magnificent, airy bubbles that resemble mini flying saucers! This magnificent puff is created by steam rapidly expanding inside the dough, pushing the top and bottom layers apart to form the hollow pocket. Once fully puffed and lightly golden around the edges, carefully remove them from the oven. Don’t overbake, as this can make them brittle and prevent them from forming soft pockets.
Learning from Mistakes: My Pita Trials and Triumphs
Like any skill worth mastering, my first attempts at baking pita weren’t entirely smooth sailing. The initial four pitas were rolled too thin in the center, and consequently, they didn’t form those beautiful, large bubbles. Instead, they ended up flat, crispy, and, frankly, looked a bit like culinary mishaps that were best suited for the bin. “Great,” I thought with a sigh, “now Seamus has some unexpected dog treats!” It was a humbling start.
But by the fifth pita, I finally hit my stride, understanding the subtle nuances of thickness and heat. It was perfect! A huge, glorious air pocket had formed in the center, truly looking like a flying saucer, and it was wonderfully soft and pliable. Excited by my success, I carried it over to the window to capture a picture with good lighting, and PLOP! It slipped from my grasp and fell straight into the dog’s water bowl. A potent wave of frustration washed over me; I wanted to cry and impulsively throw that soggy pita pocket across the room. If it weren’t for a pair of beautiful 9-year-old blue eyes staring at me with innocent amusement, I just might have. Instead, my daughter simply laughed at my misfortune, and I reluctantly tossed the unfortunate pita into the garbage, taking a deep breath and pushing onward with renewed determination.
Victory and Enjoyment: The Perfect Homemade Pita
I persevered, and the last three pitas I made were as fabulous as the one that had met an untimely end in the dog bowl. I found my rhythm, understood the subtle cues of the dough’s texture and the oven’s heat, and finally mastered the technique. These final pitas were wonderfully soft and chewy, perfectly puffed with magnificent pockets, and not a single one was burnt. What a victory! I had successfully made my own pita pockets, feeling like a true baking boss who had conquered the challenges of yeast. I only wished I had figured out the nuances with the first four, but every chef knows that practice makes perfect, and mistakes are simply lessons in disguise.
This experience truly proves that you never learn without attempting. Even if a pita takes an unexpected dip in the dog water, at least you tried, and learned something invaluable in the process! If I could, I would proudly stick these three perfectly puffed pitas on the fridge right next to my daughter’s latest drawings. That’s how proud I am of this homemade achievement, a testament to perseverance and the simple joys of baking from scratch.
Serving Suggestions for Your Freshly Baked Pita Bread
Now that you’ve mastered the art of homemade pita, the possibilities for enjoying this versatile bread are truly endless! Its soft texture and convenient pocket make it a perfect companion for a wide array of dishes. Here are just a few ideas to get you started:
- With Dips: This is arguably the most classic and satisfying pairing. Tear your warm pita into wedges and scoop up creamy homemade hummus, smoky baba ghanoush, refreshing tzatziki, or a zesty spicy feta dip. The pocket is perfect for holding generous amounts of your favorite dips.
- Sandwiches and Wraps: The natural pocket makes pita an ideal vessel for delicious fillings. Stuff it with falafel and tahini, grilled chicken or lamb gyros, fresh crisp veggies, halloumi cheese, or any of your favorite sandwich fillings for a portable and satisfying meal.
- Mini Pizzas: Use pita rounds as a quick, convenient, and surprisingly delicious base for individual pizzas. Top with your favorite sauce, cheese, and toppings, then bake until bubbly and golden.
- Salad Scoop: Instead of traditional croutons, tear fresh pita into pieces and use them as a delightful, soft scoop for salads. They add a wonderful texture and absorb dressing beautifully.
- Alongside Soups and Stews: Pita bread is excellent for soaking up the rich broths and sauces of hearty soups, stews, and curries, adding an extra layer of comfort to your meal.
- Simply Enjoy: Sometimes, the best way to enjoy freshly baked pita is simply torn apart and savored on its own. A light drizzle of good quality olive oil and a sprinkle of a traditional Mediterranean spice blend like za’atar can elevate this simple pleasure to an exquisite experience.
Storage Tips for Keeping Your Homemade Pita Fresh
While fresh pita is undeniably at its best enjoyed immediately after baking, you can certainly store leftovers to extend their deliciousness and savor that homemade goodness for longer:
- Short-Term Storage (Room Temperature or Refrigerator): Once your pita bread has completely cooled to room temperature, place it in an airtight plastic bag or container. It will stay wonderfully fresh at room temperature for 1-2 days. For slightly longer storage, you can refrigerate it for up to 5 days. To restore its softness and warmth, gently reheat it in a dry skillet over medium heat for a minute per side, or microwave for 10-15 seconds.
- Long-Term Storage (Freezing): For extending the life of your homemade pita even further, freezing is an excellent option. Once fully cooled, stack the pita bread with small pieces of parchment paper between each round to prevent sticking, then place them in a freezer-safe bag or wrap tightly in plastic wrap and then foil. They can be stored in the freezer for up to 2 months. To use, simply thaw the frozen pita bread at room temperature for an hour or two, and then reheat as desired using the methods mentioned above.
Enjoy! This Homemade Rustic Pita Bread recipe is a testament to the joy of baking. If you give it a try, please let me know! Snap a photo and tag me on Twitter or Instagram! I love seeing your delicious creations!
Print Recipe
Pin Recipe
Leave a Review »
Homemade Rustic Pita Bread
Ingredients
- 1⅛ cups warm water
- 1½ teaspoons granulated sugar
- 1½ teaspoons active dry yeast
- 3 cups all-purpose flour
- 1 tablespoon olive oil, plus more for coating bowl
- 1 teaspoon kosher salt
Instructions
-
In a bowl stir sugar into warm water. Sprinkle the active yeast over top and let sit to proof for 10 minutes. Next, stir in flour, salt and olive oil.
-
Knead until soft and barely sticky. Coat a bowl with olive oil, place the dough in the bowl and cover with a warm damp towel. Move to a warm place to rise and double in size. About 1 hour.
-
Once raised, remove dough and preheat oven to 500 degrees. On a lightly floured surface roll the dough into a 12 inch rope. Cut into eight pieces. Roll into balls and cover with a damp towel while rolling one dough ball at time to approximately seven inches in diameter.
-
Place 1 to 2 pitas on a cooling rack or directly on your oven rack. Bake for 4-5 minutes or until puffed in center and golden around the edges. Remove and place under a damp towel to soften and cool.
-
Repeat with remaining pitas.
-
Once cool store in a plastic bag and refrigerate for a couple days or freeze up to two months or cut in half and fill! Enjoy!