Quick & Easy
Naturally Fermented Dilly Carrots at Home
These Naturally Fermented Dilly Carrots are crisp, garlicky and flavor-packed! Not only good for you and bursting with probiotics, these also make for a great snack or served as a side at your next get together. Simple
- Serves 12 servings
- Prep 7 days
- Total 7 days
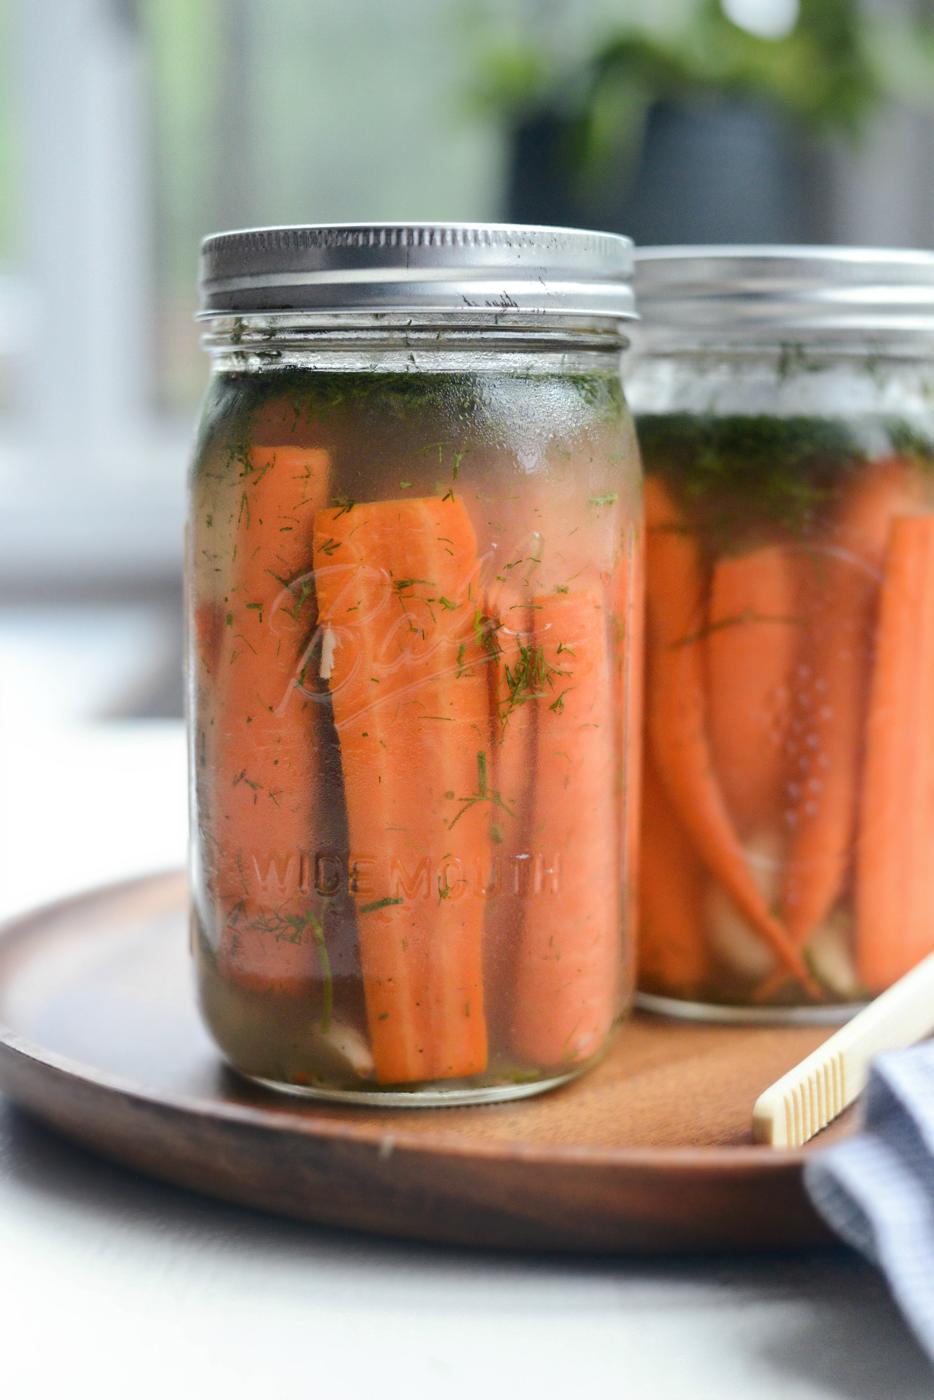
The first time I was introduced to fermented carrots, I almost passed on them because, not going to lie, the name alone intimidated me. But I’m so glad I got over it and gave them a try. Because besides being standout flavorful, these naturally fermented dilly carrots are also full of good probiotics that aid in digestion which means they are good for your gut!
WHAT IS LACTO-FERMENTING?
Lacto-fermenting is method in which fruits and vegetables, dairy and bread doughs are preserved through a process of fermentation. Different foods require different bacterias, but generally lacto-fermented veggies uses lactobacillus.
You don’t need any special equipment to lacto-ferment. Only large wide-mouth jars, ingredients like fresh garlic, vegetables or fruit, salt, spices etc. Some recipes call for whey, but I have not used it. Another perk about LF is that you don’t need to sterilize jars and lids or pressure can the fruits or vegetables! The salt in the recipe will kill any bad bacteria allowing the good bacteria (hello, probiotics!) to thrive, turning the lactose and any other sugars into lactic acid, which gives the LF food their distinct tangy flavor. Lactic acid also creates a acidic environment which will preserve the food. This was common practice before the modern day canning methods were the norm.
What Do Fermented Dilly Carrots Taste Like?
One of my go-to ways to preserve carrots is by making these naturally fermented dilly carrots. You may think that they must taste like dill pickles, right? But they don’t. There’s zero vinegar so the crunchy earthy carrots burst of fresh dill and garlic flavor.
Naturally fermented dilly carrots are addictively savory. Have them on hand for a simple healthy snack or serve at your family dinner or cookout.
To make these naturally fermented dilly carrots Set out:
- wide-mouth jar (with a tight fitting lid) – Set out a 32 ounce jar.
- carrots – I like to choose thin and narrow over giant fat carrots.
- fresh dill – Lends a sweet and grassy flavor with notes of celery and parsley.
- garlic – Adds distinct punchy flavor.
- sea salt – Lends flavor while keeping any bad bacteria at bay, allowing the good bacteria to thrive.
- water – Preferably distilled or filtered. (more on this within the post)
NOTE: In this post I’m making a double batch because one jar will go quickly around here. Simply note that the recipe below is for one batch, so if you want 2 jars, simply double the recipe.
Start by giving a good smash to 2 to 3 cloves of garlic. Next peel and drop the smashed garlic cloves into a clean 32 ounce wide mouth jar. The wide mouth is important, so you can fit the carrots in easily and because it’s more convenient when it comes to serving.
Then measure and add in 1 to 2 tablespoons chopped fresh dill and 2 tablespoons sea salt.
Next, depending on the sized of the carrots, I first remove the green tops off and cut in half, so each carrot is in two shorter pieces. Then I cut thicker ends in half lengthwise. Tilt the jar a little on its side and slide in the cut carrots.
Genuinely try to pack them full.
Note that peeling the carrots is completely up to you.
I did not, rarely do I ever peel carrots. I simply give them a good scrub and I’m good to go. I’m a rebel like that. Or I’m lazy. Hard to say.
Lastly pour in enough filtered water (about 2 cups or so) until there is an inch between the water and the top of the jar.
What is The Dependable Water To Use For Lacto-Fermenting?
From the research I’ve done, water rich in minerals is ideal for lacto-fermentations. Keep in mind that if your water is too rich in minerals, it may interfere with the fermentation process and reduce the activity of the microorganisms. I have/use reverse osmosis water, but have made this dish using distilled. If using tap water you will want to boil (and cool to room temperature) to remove chlorine and any bacteria that might be present OR filter using a carbon filter (like a Brita).
Then secure the lids tightly and give it a shake to dissolve the salt. Next, loosen the lids slightly and set the jar (or jars) out on your countertop at room temperature for 4 to 5 days. If at any point you hear a hissing coming from your jar you will want to loosen the lid a smidgen.
After day 4 the water should be cloudy and you may see gassy looking bubbles floating from the bottom to the top of the water. This is fermentation in the works!
Now that you’ve waited 4 (quite long and impatient) days, give the naturally fermented dilly carrots a try! They should be crispy, crunchy, garlicky and flavor-packed! You might even notice that when you open the jar, you’ll hear a small pop like you would if you opened a “canned” jar of let’s say, pickles. After the 4 or 5 days on the counter, I keep my fermented carrots sealed tightly in the fridge because Worth keeping these chilled!
Lastly, incase you were wondering, I use these bamboo tongs which make snagging a carrot unfussy (and it’s sanitary!)🤣 The tongs are also helpful getting toast, English muffins or a bagel out of the toaster! Mine are from Pampered Chef, however you can find a lot of options on amazon (linked below in the recipe printable).
Enjoy! And if you give this Naturally Fermented Dilly Carrots recipe a try, let me know! Snap a photo and tag me on twitter or instagram!
The recipe
Carrots: Naturally Fermented Dilly
These Naturally Fermented Dilly Carrots are crisp, garlicky and flavor-packed! Not only good for you, these also make for a great snack or served next to pickles at your next get together. Simple ingredients and nature does all the work.
- Serves 12 servings
- Prep 7 days
- Total 7 days
Ingredients
- 1 clean 32 ounce glass, wide-mouth jar with tight fitting lid
- 1 bunch carrots with leafy green tops (unpeeled (about 6))
- 2 to 3 cloves garlic (smashed and peeled)
- 2 tablespoon chopped fresh dill
- 2 tablespoons sea salt
- filtered water
Method
- 1
Trim off the leafy tops of the carrots and cut in half so you have 2 shorter carrots. Cut the thicker ends, in half lengthwise.
- 2
Place the smashed and peeled garlic cloves, fresh dill, sea salt and carrots into the jar. Fill to within one inch of the top with filtered water.
- 3
Cover loosely and allow to sit at room temperature for 4-7 days; you can try them at 4 days and see if you want them to be more sour or not, to get them more sour/soft leave them out at room temperature longer. Because the carrots are more dense, they take longer to ferment than other lactoferments like sauerkraut or pickles. They also stay crunchier, which we like!
- 4
After fermenting at room temperature, tighten the lid and keep in your fridge and they last for up to 6 months!
From the cook
This method is for 1 jar. For 2 jars, simply double this method. Nutrition Disclaimer: All information presented on this site is intended for informational purposes only. I am not a certified nutritionist and any nutritional information shared on this site should only be used as a general guideline.
Tools
- Bamboo Tongs
Per serving
- Serving1 g
- Calories12 kcal
- Carbohydrates3 g
- Protein1 g
- Fat1 g
- Saturated Fat1 g
- Polyunsaturated Fat1 g
- Monounsaturated Fat1 g
- Sodium1182 mg
- Potassium93 mg
- Fiber1 g
- Sugar1 g
- Vitamin A4739 IU
- Vitamin C2 mg
- Calcium11 mg
- Iron1 mg