
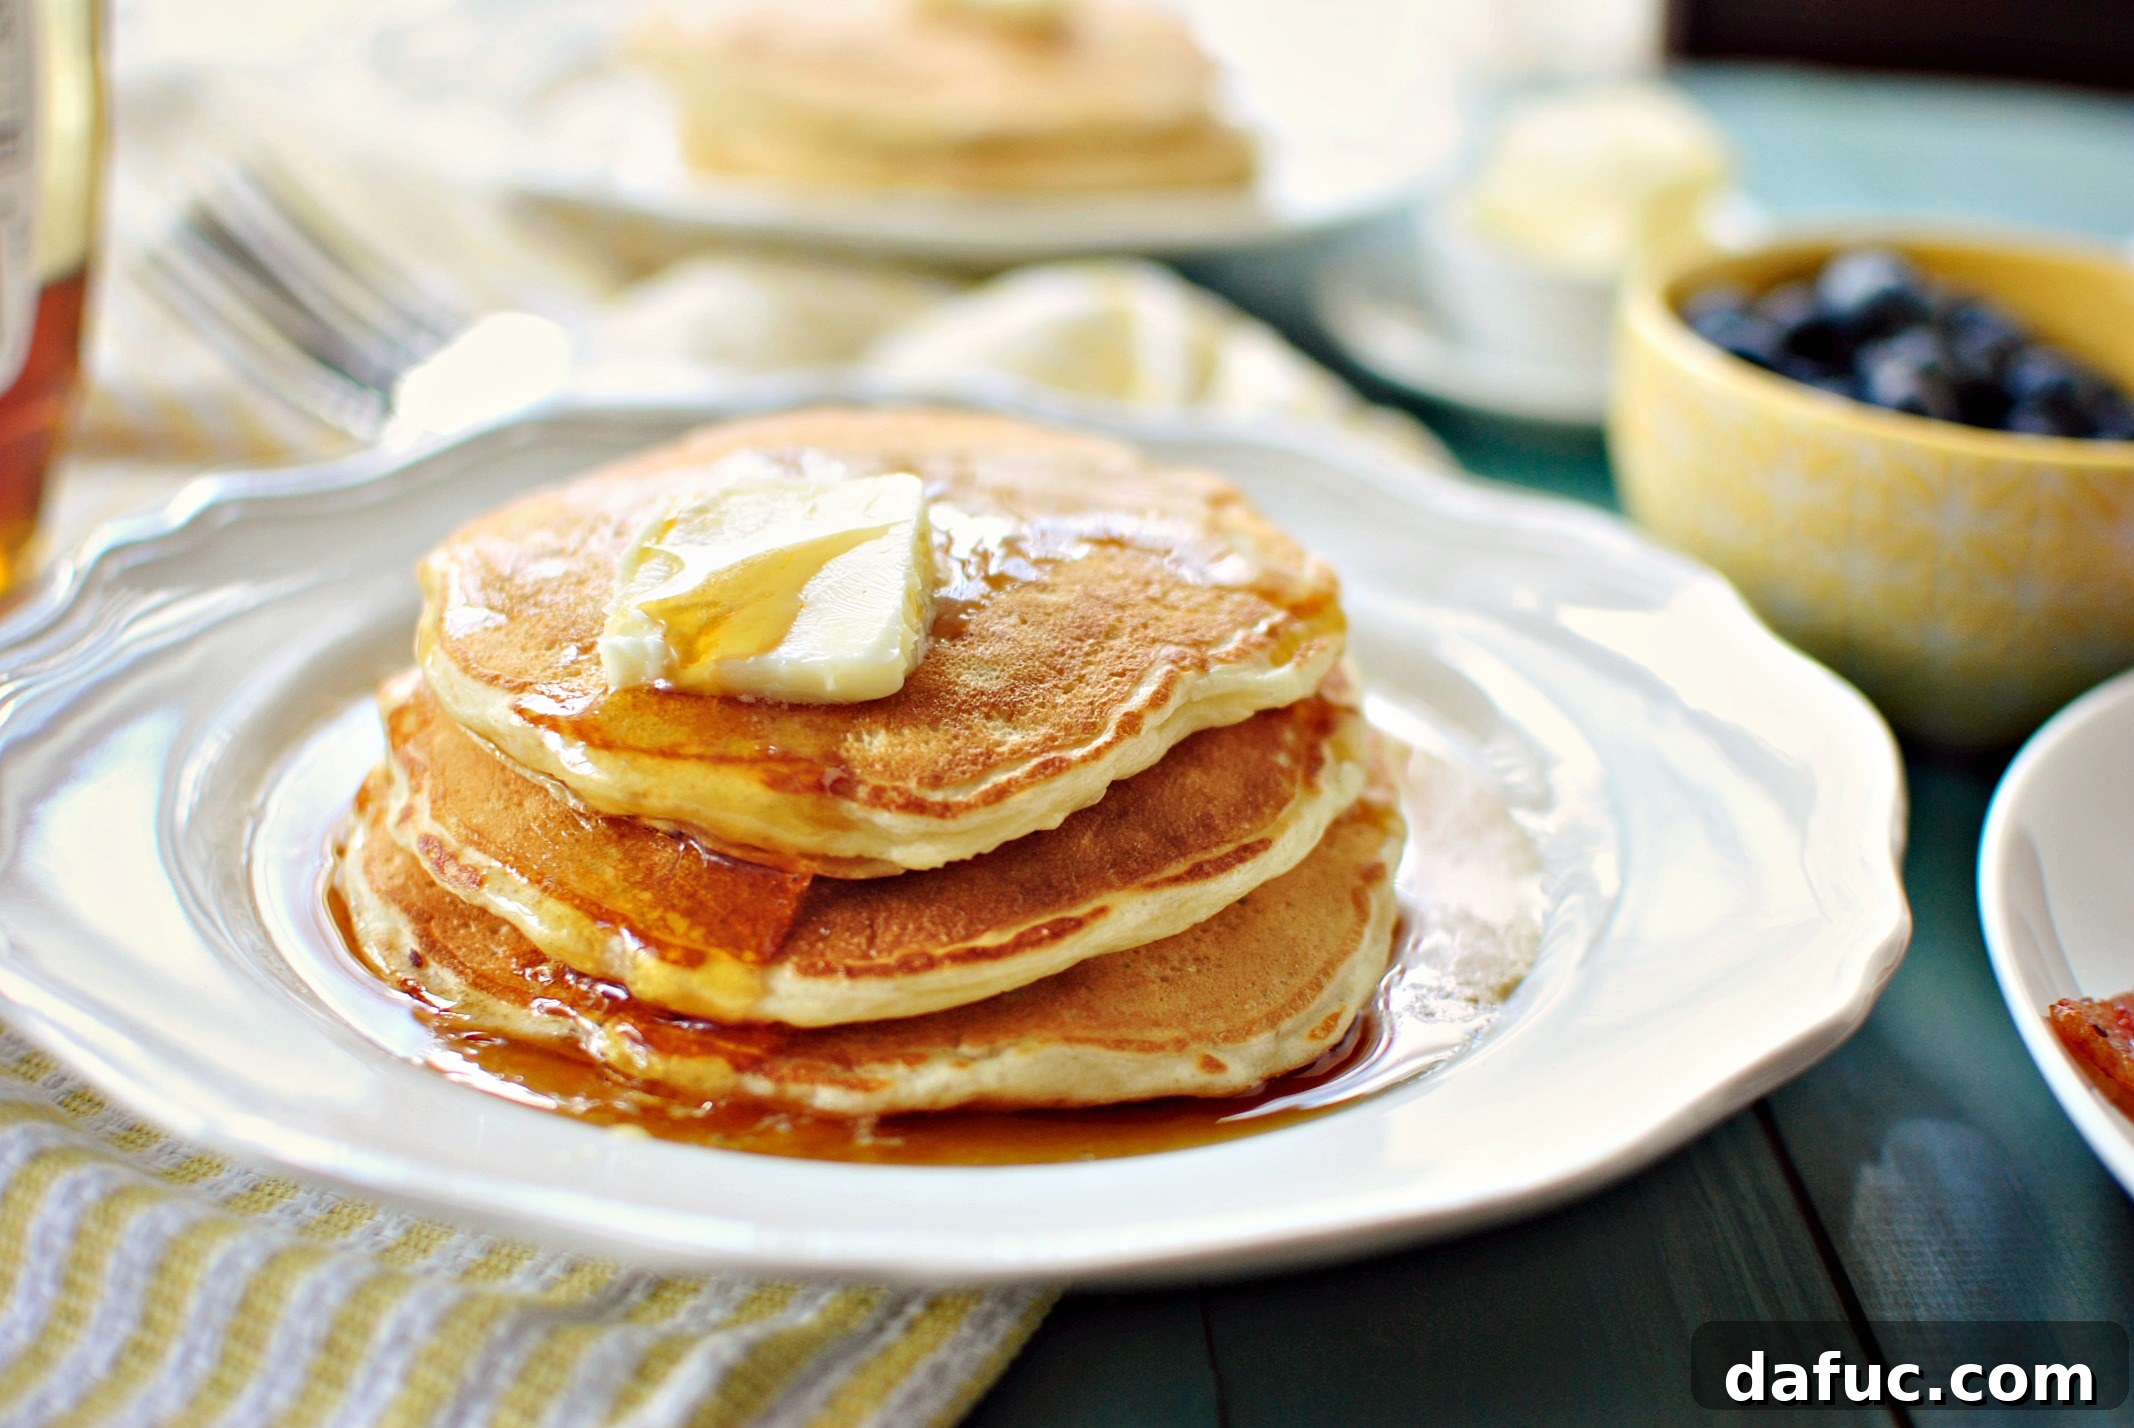
The Ultimate Guide to Fluffy Buttermilk Pancakes: A Recipe That Converts Even the Toughest Critics
Discover the secret to making the most exquisite homemade buttermilk pancakes – light, airy, and utterly delicious. This recipe is designed to yield approximately 16 generously sized pancakes or about 36 charming silver dollar pancakes, perfect for any occasion.
More Than Just Breakfast: A Story of Pancake Transformation
Today is a truly special day for any breakfast enthusiast, especially those looking for a recipe that transcends the ordinary. Not only are you about to receive what I confidently believe to be the best buttermilk pancake recipe you’ll ever encounter, but you also get a glimpse into my kitchen, where my wonderful nine-year-old daughter, with her adorably chipped pink nail polish, helps bring these culinary delights to life. What’s not to adore about a recipe that’s both delicious and a family affair?
The Magical Power of These Pancakes: Turning Haters into Lovers
Here’s a little secret about this recipe: these pancakes possess a peculiar, almost magical ability to convert even the most staunch pancake skeptics into enthusiastic devotees. My husband, Pat, and I have shared nearly two decades together, and for as long as I’ve known him, he has vehemently declared his disdain for pancakes. His primary complaint? They’re “too cake-y.” A reason I’ve never quite understood, but one I’ve always good-naturedly accepted. Over the years, I’ve prepared countless batches of these very pancakes, often serving them alongside his favorite fried eggs, fully expecting him to pass them by without a second glance.
It’s no secret among our family that I have a knack for getting them to try new foods – things they often think they’ll despise, but which I instinctively know they’ll love. From caramelized balsamic glazed Brussels sprouts to rich bacon gorgonzola guacamole, I’ve had my share of triumphs. And now, these buttermilk pancakes join that esteemed list! To my absolute delight and his utter surprise, Pat didn’t just *like* them; he *loved* them. He even conceded they were “so not cake-y,” whatever that truly signifies. It just goes to show, with the right recipe, a pancake victory is always possible!
The Foundation of a Perfect Weekend Breakfast
Every home, in my opinion, should be equipped with a reliable, go-to pancake recipe. It’s the cornerstone of a relaxed weekend breakfast, the kind that invites everyone to gather around the table. Picture this: sizzling bacon, a handful of fresh, plump blueberries, and a stack of these golden, fluffy delights – you’ve instantly created a breakfast feast worthy of any special occasion. It’s truly astonishing what simple, basic ingredients can achieve when combined with a touch of culinary love. While the ingredients themselves are straightforward, I’ve always found an extra layer of flavor comes from griddling them on my cherished hand-me-down 1975 griddle, lovingly coated with a thin layer of coconut oil. Could that be the secret ingredient? Perhaps. But it certainly adds a unique charm to each pancake.
Crafting Your Perfect Buttermilk Pancakes: A Step-by-Step Guide
Creating these heavenly buttermilk pancakes is a joyous process, and involving little helpers only adds to the fun. Follow these detailed steps to achieve pancake perfection:
The Dry Ingredients: Foundation of Fluffiness
Step 1: Flour. Begin by measuring precisely 2 cups of unbleached all-purpose flour into a spacious mixing bowl. Using unbleached flour can sometimes contribute to a slightly lighter texture in your final pancakes.
Step 2: Sweetness. Next, incorporate two tablespoons of granulated sugar. This provides a delicate sweetness that balances the tanginess of the buttermilk.
Step 3: Leavening Power. Add one teaspoon of baking powder. This crucial ingredient works in conjunction with baking soda to give your pancakes that irresistible lift and fluffiness.
Step 4: The Buttermilk Activator. Follow with half a teaspoon of baking soda. This alkaline ingredient reacts with the acidity in the buttermilk, creating carbon dioxide bubbles that make the pancakes exceptionally tender and light.
Step 5: A Pinch of Flavor. Finally, measure out a half teaspoon of kosher salt and add it to the dry mixture. Salt enhances all the other flavors, bringing out the best in your pancakes. My daughter finds this step particularly amusing, though achieving an “adorable” measurement technique seems to elude me!
Step 6: Combine Dry. Grab a whisk and gently stir the dry ingredients until they are thoroughly combined. Ensure there are no pockets of baking powder or soda. My daughter, with her charming “bed head,” makes even whisking look effortless and perfect. Once mixed, set this bowl aside.
It’s incredible how quickly children grow; I fondly recall my daughter, the one with the chipped nail polish here, looking much younger, perhaps around five years old, when she first appeared on this blog helping with our homestyle meatloaf recipe.
The Wet Ingredients: The Heart of the Batter
Step 7: Buttermilk Base. In a separate, medium-sized bowl, measure out 2 and 1/4 cups of buttermilk. Buttermilk is key to these pancakes’ tender crumb and subtle tang. If you don’t have buttermilk, you can make a substitute by adding 1 tablespoon of white vinegar or lemon juice to a measuring cup, then filling the rest of the way to 2 and 1/4 cups with regular milk. Let it sit for 5 minutes until it curdles.
Step 8: Eggs for Structure. Crack and add 2 large eggs into the buttermilk. Eggs provide structure and richness to the pancakes. It’s always a wonder how effortlessly nine-year-olds carry off chipped nail polish; I can only dream of my fingers looking so charming, polished or not.
Step 9: Richness from Butter. Carefully pour in 3 tablespoons of melted butter. Ensure the butter has cooled slightly before adding it to the eggs and buttermilk to prevent scrambling the eggs or curdling the buttermilk.
Step 10: Initial Whisk. Whisk the wet ingredients together just enough to break up the egg yolks and combine them with the buttermilk and butter.
Step 11: A Hint of Vanilla. Measure and add one teaspoon of pure vanilla extract. Vanilla elevates the overall flavor profile, adding warmth and depth to your pancakes.
Step 12: Final Wet Mix. Stir gently once more to fully incorporate the vanilla extract with the other wet ingredients.
Combining and Cooking: The Art of Pancake Making
Step 13: Marrying Wet and Dry. Create a shallow well in the center of your dry ingredients mixture. This helps in gradually incorporating the wet ingredients.
Step 14: Gentle Combination. Pour the combined buttermilk, egg, butter, and vanilla mixture directly into the well of the dry ingredients.
Step 15: The Lumpy Secret. Whisk the batter just until the dry ingredients are moistened and incorporated into the wet. A slightly lumpy batter is not only acceptable but desirable for truly fluffy pancakes. Overmixing can develop the gluten in the flour, resulting in tough, flat pancakes instead of the light, airy texture we’re aiming for.
Step 16: The Rest is Best. Let the pancake batter rest for about 5 minutes while you preheat your griddle or pan. This resting period allows the gluten to relax and the baking soda/powder to begin its work, ensuring a tender and airy pancake.
The batter should be visibly light and slightly bubbly after resting.
Griddle Time: Cooking Your Pancakes to Golden Perfection
Step 17: Prep Your Surface. Spoon about a tablespoon of coconut oil onto your preheated griddle or pan. If you prefer a subtle coconut flavor, opt for unrefined coconut oil. For smaller skillets, you’ll naturally use less oil. Ensure your griddle is heated to approximately 375°F (190°C) – a good test is to flick a few drops of water onto the surface; they should sizzle and evaporate immediately.
Step 18: Coat Evenly. Use a spatula or paper towel to spread the melted coconut oil evenly across the entire cooking surface. This ensures a consistent golden-brown crust on your pancakes.
Step 19: Portioning. Using a 1/4 cup measuring scoop, portion out the pancake batter. For larger pancakes, you can gently spread the batter out with the back of the scoop after pouring.
Step 20: Griddle and Watch. Pour the batter onto the preheated griddle. Cook for about 2-3 minutes per side. You’ll know it’s time to flip when bubbles begin to form on the surface of the pancake and, crucially, when these bubbles pop and do not fill back in. The edges should also look set.
The appearance of persistent bubbles is your visual cue to prepare for the flip.
Step 21: The Flip! With a quick, confident motion, flip each pancake. Continue cooking on the second side for another 1-2 minutes, or until golden brown and cooked through.
Step 22: Keep Warm. As you continue cooking the remaining batter, transfer the finished pancakes to a rimmed baking sheet and keep them warm in a preheated oven set to 200°F (93°C). This ensures every pancake reaches the table warm and ready to enjoy. Per the enthusiastic request of both my daughters, we often make a batch of silver dollar pancakes alongside the full-sized ones.
Serving Suggestions: Elevate Your Pancake Experience
The journey doesn’t end when the pancakes leave the griddle; it’s just the beginning of a delicious adventure!
Classic Topping: Butter. Naturally, the first step is to crown your stack with a generous pat of butter. It melts beautifully, adding a rich, creamy element to every bite.
Sweet Drizzle: Maple Syrup. A delicate drizzle of pure maple syrup is essential. Its natural sweetness and rich flavor are the perfect complement to the buttermilk tang.
Or, if you’re like me and truly savor the experience, go ahead and indulge in a lot of maple syrup!
Now, dive in and savor every bite of these incredible pancakes!
The Buttermilk Pancake Obsession
These perfect buttermilk pancakes are, in my deeply pancake-obsessed opinion, truly flawless. This particular buttermilk variation marks my ninth unique pancake recipe shared on this blog, and if we were to count the delightful pancake muffins, that tally jumps to eleven! Yes, it’s true, I might have a slight pancake addiction, but when the results are this delicious, it’s a problem I’m happy to have.
While this recipe was originally shared around Mother’s Day, these fluffy buttermilk pancakes are truly a gift that can be enjoyed any day of the year. I hope you and your loved ones have a wonderful time making and devouring them!
Share Your Pancake Creations!
If you give this recipe a try, I’d absolutely love to hear from you! Snap a photo of your magnificent buttermilk pancakes and share them with me on Twitter or Instagram. Don’t forget to tag me so I can see your delicious results!
More Deliciousness from Simply Scratch
My cookbook Simply Scratch: 120 Wholesome Homemade Recipes Made Easy is now available! CLICK HERE for details and THANK YOU in advance for your support!
[This post may contain affiliate links, which means I may receive a small commission if you make a purchase through these links, at no extra cost to you. Thank you for supporting Simply Scratch!]
Pin Recipe
Leave a Review »
8 servings
Perfect Buttermilk Pancakes
15 mins
8 mins
23 mins
Ingredients
- 2 cups unbleached all-purpose flour
- 2 tablespoons sugar
- 1 teaspoon baking powder
- 1/2 teaspoon baking soda
- 1/2 teaspoon kosher salt
- 2¼ cups buttermilk
- 2 large eggs
- 3 tablespoons butter, melted and cooled
- 1 teaspoon pure vanilla extract
- 1 tablespoon coconut oil, or butter for griddle
Equipment
-
BLACK+DECKER Family-Sized Electric Griddle with Warming Tray & Drip Tray, GD2051B
Instructions
-
In a large bowl, measure out the flour, sugar, baking powder, baking soda, and salt. Whisk to combine them thoroughly.
-
In a second separate bowl, combine the buttermilk, eggs, melted and cooled butter, and vanilla extract. Whisk these wet ingredients until well combined. *If your butter is still too warm, consider adding it directly to the dry ingredients to prevent scrambling the eggs or curdling the buttermilk.
-
Create a shallow well in the center of your dry ingredients. Pour the wet mixture into this well. Whisk gently until the dry and wet ingredients are just incorporated. A slightly lumpy batter is ideal for fluffy pancakes; avoid overmixing.
-
Let the batter rest for 5 minutes. During this time, preheat a griddle (or a large skillet) to 375 degrees Fahrenheit (190°C) and lightly coat it with coconut oil or butter. Once heated, use a 1/4 cup scoop to portion the batter. Slowly pour each scoop onto the griddle and gently spread the batter out with the back of the scoop to form larger pancakes. Griddle for 4-6 minutes, or until the underside is golden brown and bubbles appearing on the surface no longer fill back in when they pop.
-
Flip the pancakes and continue to cook for another 3-4 minutes, or until golden brown and cooked through. Transfer the cooked pancakes to a rimmed sheet pan and keep them warm in a 200-degree Fahrenheit (93°C) oven while you continue cooking the remaining batter.
-
Serve your perfect buttermilk pancakes immediately, topped generously with butter, pure maple syrup, and your favorite fresh berries. Enjoy every fluffy bite!
Calories: 240kcal,
Carbohydrates: 30g,
Protein: 7g,
Fat: 10g,
Saturated Fat: 6g,
Polyunsaturated Fat: 1g,
Monounsaturated Fat: 2g,
Trans Fat: 1g,
Cholesterol: 65mg,
Sodium: 394mg,
Potassium: 144mg,
Fiber: 1g,
Sugar: 6g,
Vitamin A: 311IU,
Calcium: 120mg,
Iron: 2mg