
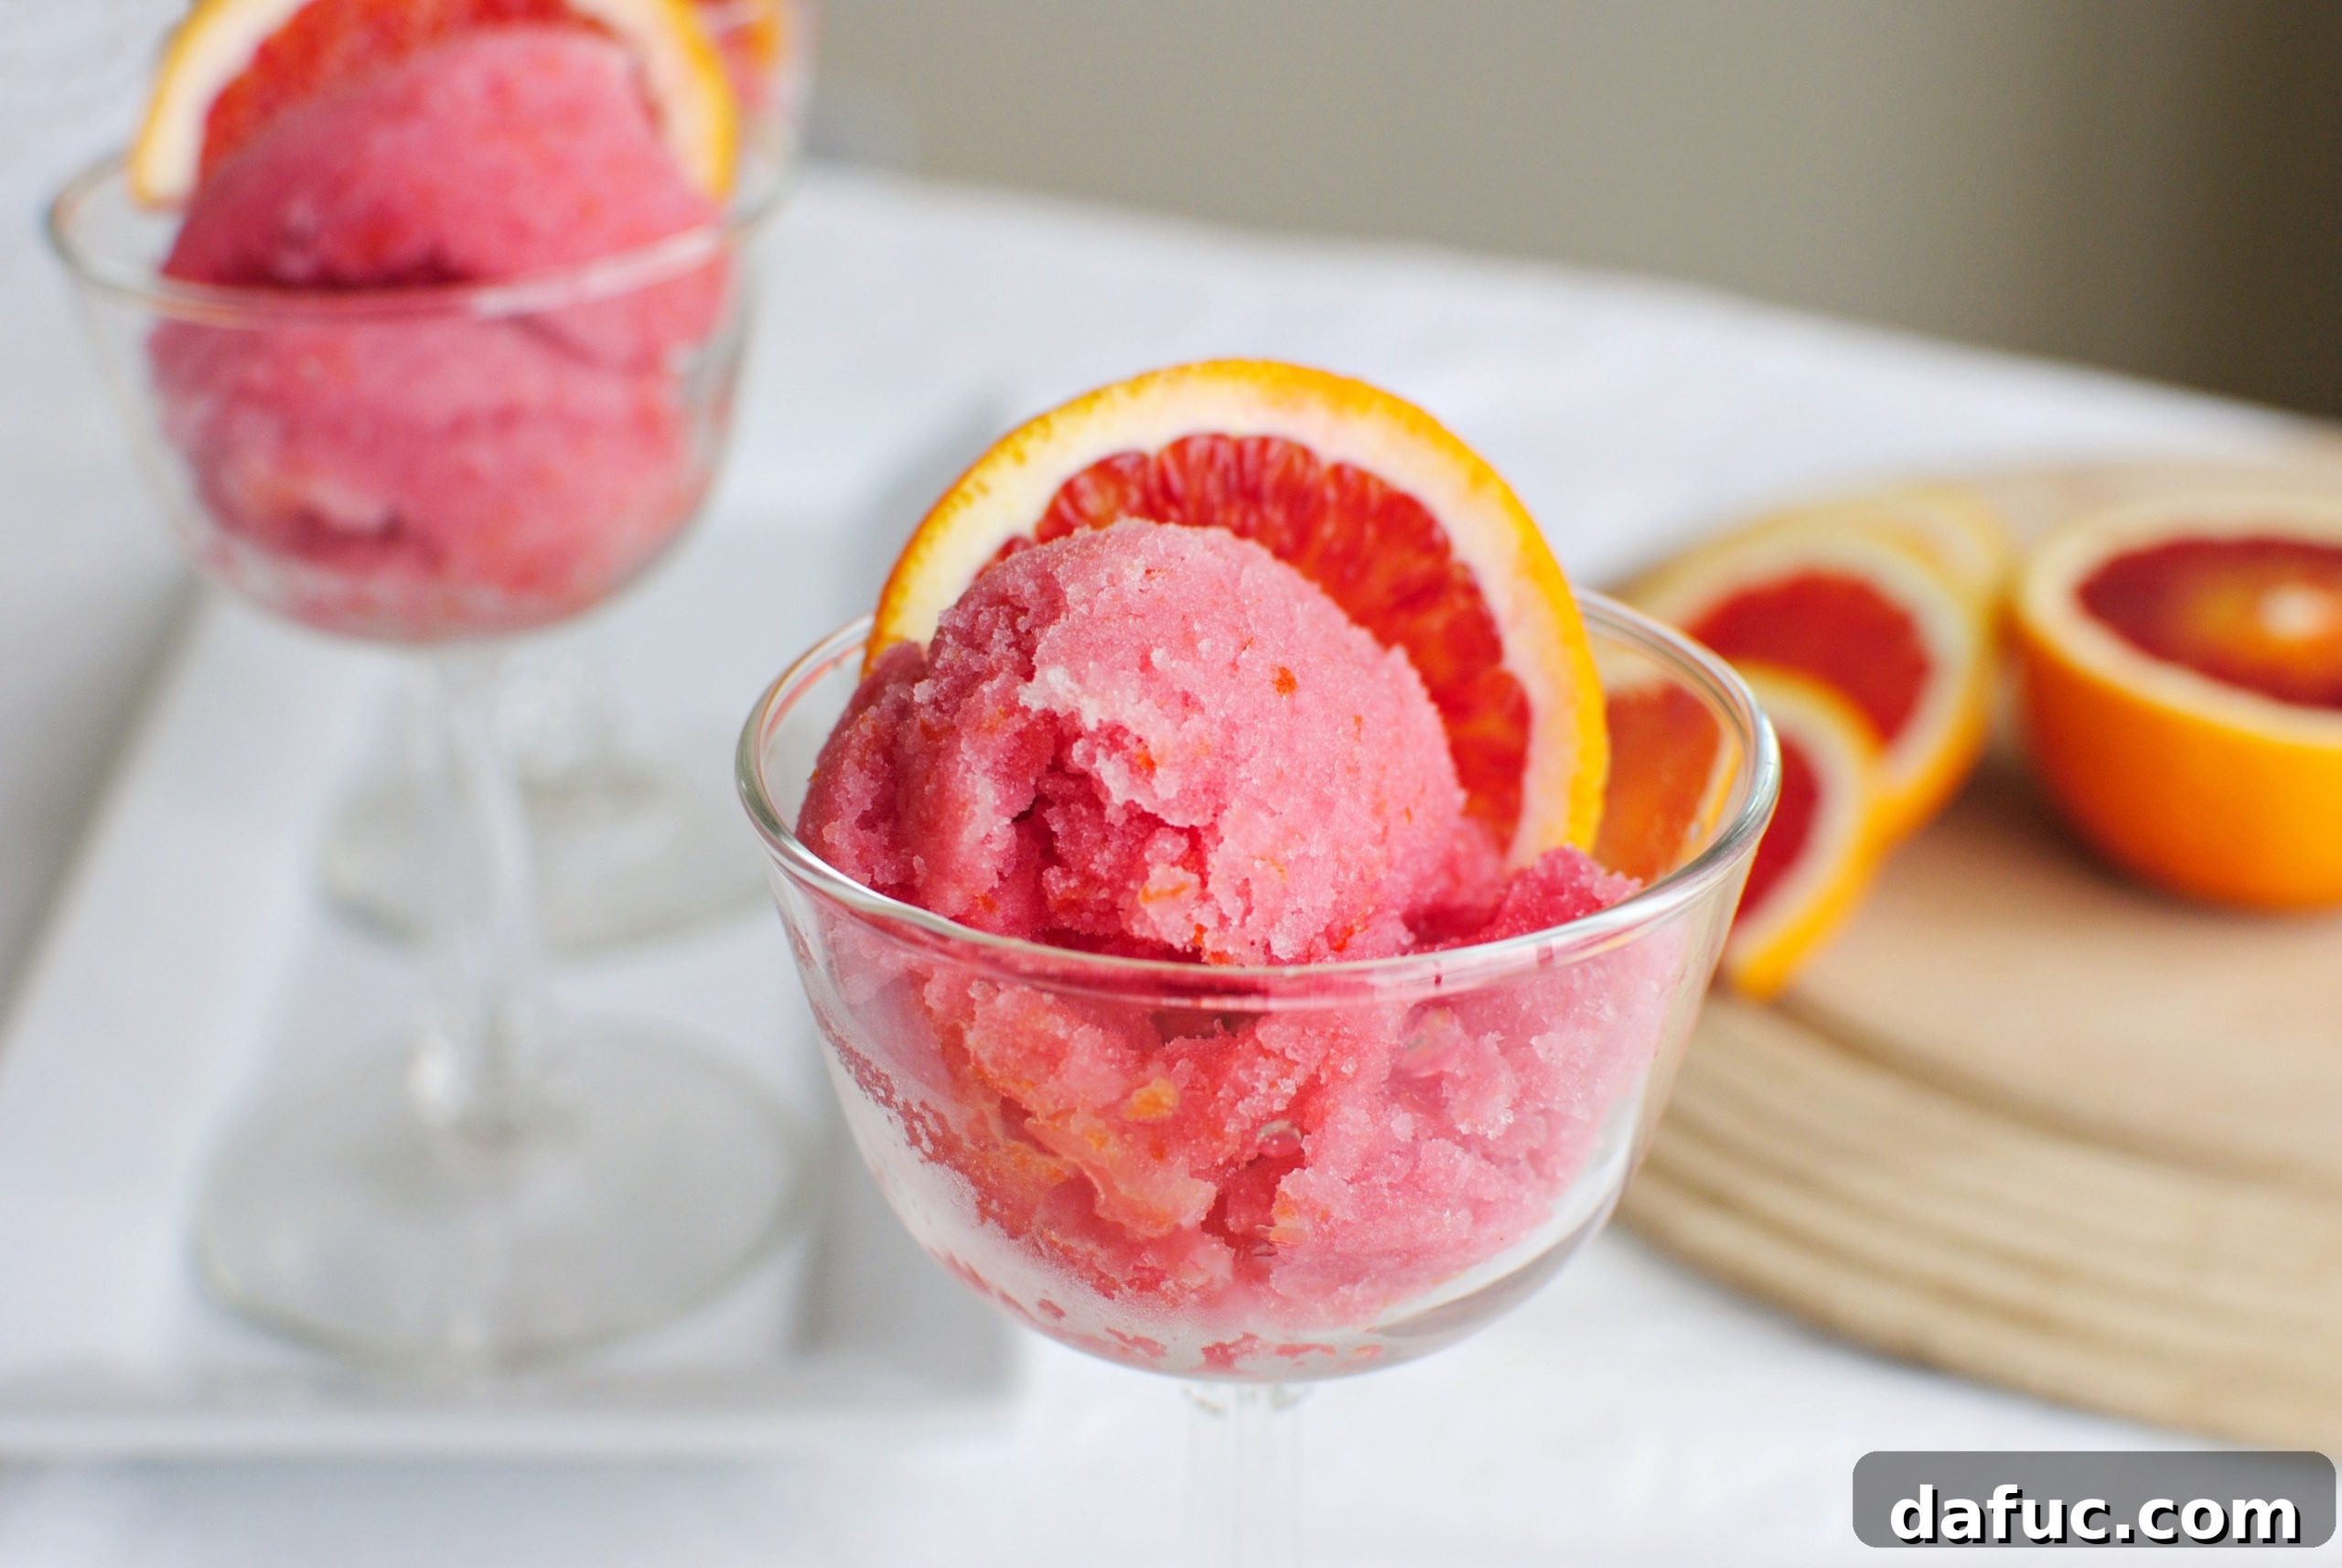
Prepare to be enchanted by the most beautiful pink hue you’ve ever seen in a frozen dessert. This Blood Orange Honey Sorbet is not just a feast for the eyes but a symphony for the taste buds, delivering a perfectly balanced sweet and citrusy flavor. And the best part? It requires only three humble ingredients: freshly squeezed blood oranges, pure honey, and water. A truly simple luxury, perfect for any occasion.
The Seasonal Hunt for the Perfect Blood Oranges
Like a dedicated hunter stalking its prized seasonal prey, I spend weeks anticipating the arrival of blood oranges at my local grocery store. There’s a certain thrill in finding those vibrant beauties, knowing the delightful creations they promise. Last week, my patience was finally rewarded! The citrus stands were overflowing with them, priced at an irresistible five for two dollars. Without a moment’s hesitation, I happily scooped up ten, my steps lighter with the excitement of an upcoming culinary adventure. I knew instantly what these ruby gems were destined for: a luscious sorbet, or “sherbert” as some might call it – a refreshingly simple dessert that perfectly captures their unique essence.
Unlocking the Magic of Homemade Sorbet with Your Ice Cream Maker
It’s almost embarrassing to admit, but despite owning a Kitchen Aid ice cream attachment for nearly a year, this Blood Orange Honey Sorbet marks my very first “ice cream” recipe made with it. What was I waiting for? The process is unbelievably easy, turning simple ingredients into a gourmet frozen treat with minimal effort. If you have an ice cream maker tucked away in your pantry, now is the time to dust it off. You’ll be amazed at how quickly you can create delectable desserts that are far superior to store-bought options, offering pure, unadulterated flavor without any artificial additives.
Blood Oranges: A “Horrible Name” for a Beautiful Fruit
Let’s be honest, “blood orange” isn’t the most appetizing name for a fruit, is it? Yet, this seemingly grim moniker belies the absolute splendor contained within. These extraordinary citrus fruits are a marvel of nature, distinct from their more common orange cousins. You can often spot a blood orange by the subtle, dark red speckling on its exterior skin, a hint of the magic within. But the true reveal comes when you slice into one, discovering a spectacular, glorious ruby-red interior – a color so rich and captivating, it’s truly love at first sight. If there were a paint color named “Blood Orange,” I’d undoubtedly paint my entire kitchen with it! This intense pigmentation, caused by anthocyanins, not only makes them visually stunning but also packs a punch of antioxidants.
The Essentials: Just 3 Ingredients for Pure Sorbet Bliss
The beauty of this Blood Orange Honey Sorbet lies in its incredible simplicity. You truly need only three core ingredients to create this exquisite frozen dessert, making it an accessible and fuss-free recipe for even novice home cooks. The quality of these few ingredients, however, makes all the difference, so opt for the freshest and best you can find.
- Fresh Blood Oranges: The star of the show. Their unique sweet-tart flavor with hints of raspberry and their stunning color are irreplaceable.
- Pure Honey: Provides natural sweetness and a lovely floral counterpoint to the citrus. It also helps achieve that desirable smooth, scoopable texture in sorbet. Alternatively, regular granulated sugar can be used.
- Water: The base for our simple syrup, helping to dissolve the sweetener and create the perfect liquid consistency for churning.
That’s it! Just three ingredients to unlock a world of refreshing, homemade sorbet. Here’s exactly how this delightful process unfolds, step-by-step.
Crafting Your Blood Orange Honey Sorbet: A Step-by-Step Guide
Creating this sorbet is a straightforward process, broken down into a few key stages. Paying attention to each step ensures a vibrant flavor and perfect texture.
Step 1: Zest for Zestiness – Preparing Your Simple Syrup
First, grab a microplane or a fine grater. Carefully zest about a tablespoon and a half of the vibrant outer skin from a few of your blood oranges. Be mindful to only get the colored part and avoid the bitter white pith underneath – this is where all the aromatic oils reside, and they will infuse our sorbet with an incredible depth of citrus flavor. Watch your knuckles!
In a small saucepan, combine 1 1/2 cups of water with 1/2 cup of honey (or granulated sugar, if preferred). Add the freshly grated blood orange zest to the pan. Stir all the ingredients together over high heat, bringing the mixture to a rolling boil. Once it reaches a boil, immediately remove the pan from the heat. This quick boil dissolves the honey (or sugar) and allows the zest’s essential oils to infuse beautifully into the syrup. Set it aside to cool completely; it’s crucial for the syrup to be thoroughly chilled before combining with the orange juice.
Step 2: Liberating the Ruby Segments – Prepping the Oranges
Now, it’s time to prepare the blood oranges for juicing. Start by slicing off the top and bottom ends of each orange, creating flat surfaces. Place an orange on one of these flat ends and, using a sharp knife, carefully slice downwards, following the curve of the fruit to remove all the rind and white pith. Work over a bowl to catch any escaping juices.
Once peeled, slice between the white membranes to release the individual orange segments, a technique known as “supreming.” This meticulous process ensures you get pure, pith-free orange flesh. As you segment, continue to catch all the precious juice in the bowl below. Witnessing the stunning, vibrant color of these fruits during this process is truly mesmerizing – it’s a deep, rich ruby red that speaks of intense flavor. Gather all those beautiful, jewel-like segments and any collected juice.
Once you’ve extracted all the segments and juice, you can discard the remaining peels. A little kitchen hack: dumping a few orange peels down the garbage disposal can help deodorize it, leaving your kitchen smelling fresh and citrusy!
Step 3: Pureeing for Perfection – Creating the Sorbet Base
Transfer all of your glorious blood orange segments and the collected juice to the bowl of a food processor. Process for about 30 seconds, or until the oranges are completely liquefied and you have a smooth, vibrant orange puree. This step ensures a silky-smooth sorbet texture without any fibrous bits.
Measure out approximately two and a half cups of this fresh blood orange juice. Combine this measured juice with the completely cooled honey-zest simple syrup you prepared earlier. Stir everything together thoroughly to ensure the flavors are well integrated. The color at this stage is absolutely stunning – a deep, captivating pinkish-red that promises pure delight.
Step 4: Chilling for Flavor Infusion
Pour the combined blood orange and honey base into a container with a tight-fitting lid. Refrigerate this mixture for a minimum of 5-6 hours, or ideally, overnight. This chilling period is crucial for two reasons: firstly, it ensures the base is thoroughly cold, which is essential for proper churning in an ice cream maker, and secondly, it allows the flavors to meld and deepen, resulting in a more complex and satisfying sorbet.
Step 5: Churning to Sorbet Perfection
When your base is perfectly chilled, it’s time for the ice cream maker. If you’re using a Kitchen Aid attachment, ensure its bowl has been frozen for at least 15 hours prior to churning for optimal results. Turn your ice cream maker on to the “stir” setting, and slowly pour in the chilled blood orange and honey base. Like magic, you’ll watch as the mixture begins to thicken and freeze, transforming into a soft, airy sorbet. Churn according to your manufacturer’s instructions, typically for 20-30 minutes, until it reaches a soft-serve consistency.
Step 6: The Final Freeze – Achieving Scoopable Delight
Once churned, transfer the soft sorbet from the ice cream maker into a freezer-safe container with a lid. Press a piece of parchment paper or plastic wrap directly onto the surface of the sorbet to prevent ice crystals from forming. Place the container in your freezer for a few hours or, even better, overnight. This final freezing period allows the sorbet to firm up to a perfectly scoopable consistency.
You’ve done it! The wait is the hardest part, but oh so worth it.
Savoring Every Guilt-Free Scoop
There’s immense satisfaction in enjoying something you’ve created from scratch. I always make sure to eat this Blood Orange Honey Sorbet verrrry slowly, allowing each spoonful to melt on my tongue. I savor the delicate texture, the perfect balance of sweet honey, and the invigorating burst of citrus. All those hours spent patiently waiting for this one little bowl of sorbet truly pay off in a moment of pure, guilt-free indulgence. It’s a light, refreshing, and naturally delicious treat that satisfies without compromise.
Enjoy! And if you give this Blood Orange Honey Sorbet recipe a try, I’d absolutely love to hear from you! Snap a photo of your beautiful creation and tag me on Twitter or Instagram! Share the sweetness!
Print Recipe
Pin Recipe
Leave a Review »
8
servings
Blood Orange Honey Sorbet
25 minutes
5 hours
5 hours
25 minutes
Ingredients
- 10 blood oranges
- 1½ cup water
- 1/2 cup honey, or regular sugar
Instructions
-
Finely grate a tablespoon and a half of zest from a few blood oranges. Combine the water, zest and honey in a small sauce pan and heat until boiling, stirring often. Remove off the heat and set aside to cool completely.
-
Cut all of the rind and white pith from the oranges. Work over a bowl as you slice between the membranes to remove orange segments (supreme), catching any and all juices in the bowl below.
-
Transfer all of the orange segments and juice to a food processor and blend for about thirty seconds until liquefied. Measure two and a half cups of the pureed juice and mix it with the cooled honey syrup.
-
Cover the mixture and refrigerate for 5 hours or overnight, allowing it to thoroughly chill and for the flavors to blend beautifully.
-
In an ice cream maker (ensure the bowl is frozen for at least 15 hours if using a Kitchen Aid attachment), follow the instructions provided by your manufacturer to churn the sorbet base until it reaches a soft-serve consistency. Then, transfer to a freezer-safe container.
-
Place in your freezer overnight until completely frozen and firm enough to scoop.
Serving:
1
g
,
Calories:
72
kcal
,
Carbohydrates:
19
g
,
Protein:
1
g
,
Fat:
1
g
,
Saturated Fat:
1
g
,
Polyunsaturated Fat:
1
g
,
Monounsaturated Fat:
1
g
,
Sodium:
3
mg
,
Potassium:
40
mg
,
Fiber:
1
g
,
Sugar:
19
g
,
Vitamin A:
37
IU
,
Vitamin C:
9
mg
,
Calcium:
9
mg
,
Iron:
1
mg
Laurie McNamara
Desserts & Sweet Treats
American