
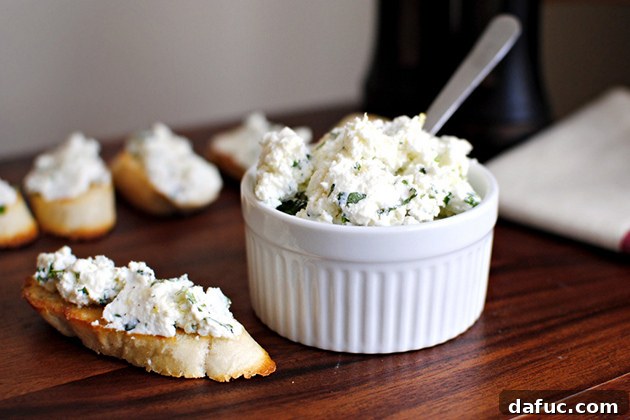
Unlock a world of fresh, vibrant flavors by creating your very own ricotta cheese at home. Imagine a creamy, cloud-like texture infused with the bright zest of lemon and the aromatic whispers of fresh basil. This isn’t just any cheese; it’s a culinary revelation that’s surprisingly simple to achieve in your own kitchen. Whether you’re smearing it generously on a slice of rustic toasted bread, enriching your favorite pasta dishes, or using it as a sophisticated dip, this homemade lemon basil ricotta promises a taste experience far superior to anything store-bought. Get ready to elevate your cooking with this incredibly easy and utterly delicious recipe.
The Secret to Exceptional Dishes: Homemade Lemon Basil Ricotta
Do you ever find yourself scrolling through endless recipes, adding intriguing culinary projects to a mental (or actual) bucket list that seems to grow longer with each passing day? For many home cooks, the idea of making fresh cheese at home falls into this category – a delightful ambition often put off due to perceived complexity. Items like artisan bread, elaborate pastries, or exotic preserves frequently make an appearance on such lists. However, nestled among these ambitious projects, for a long time, was the dream of crafting homemade ricotta cheese. The thought of transforming simple milk into a velvety, fresh cheese seemed daunting, a skill reserved for seasoned cheesemongers or highly experienced chefs. But what if I told you that this culinary fantasy is not only attainable but astonishingly straightforward?
My journey to homemade ricotta began similarly. I stumbled upon a recipe – a beacon of simplicity courtesy of America’s Test Kitchen – and instantly knew it was time to finally cross “make my own ricotta cheese” off that ever-growing list. The moment I started, I realized just how much joy and satisfaction I had been missing out on. It’s a game-changer, not just for the incredible taste, but for the sheer accomplishment of creating something so pure and delicious from scratch. This particular recipe, boasting the invigorating notes of lemon and the earthy freshness of basil, truly highlights the ricotta’s natural creaminess, transforming it into a versatile ingredient that sings in a multitude of dishes. And for those who prefer the unadulterated essence of pure ricotta, simply omit the lemon and basil, and you’ll still be left with an unparalleled fresh cheese.
Why Choose Homemade Ricotta Over Store-Bought?
The difference between homemade and store-bought ricotta is akin to comparing a freshly picked garden tomato to one from a can. While both might serve a purpose, the fresh version offers an intensity of flavor, a superior texture, and an overall vibrancy that processed alternatives simply cannot match. Store-bought ricotta often contains stabilizers and preservatives, leading to a sometimes grainy or overly firm texture and a muted flavor. Homemade ricotta, on the other hand, is luxuriously smooth, incredibly creamy, and possesses a delicate sweetness that only fresh dairy can offer. When you infuse it with fresh lemon and basil, these bright flavors are amplified, creating a ricotta that’s not just an ingredient, but a star in its own right. Once you experience the unparalleled taste and texture of homemade ricotta, you’ll understand why many swear off buying it ever again. The process itself is also incredibly rewarding, offering a deeper connection to the food you consume and creating a sense of culinary pride.
Essential Ingredients for Lemon Basil Ricotta
Making this delightful lemon basil ricotta requires only a handful of readily available ingredients. The beauty of this recipe lies in its simplicity and the emphasis on fresh, quality components that truly shine through in the final product. You’ll need:
- **Whole Milk:** The foundation of your ricotta. Using whole milk is crucial for achieving that rich, creamy texture and full-bodied flavor. Skim or low-fat milk will result in a much drier, less flavorful ricotta.
- **Fresh Lemon Zest and Juice:** These are the bright, acidic stars that not only curdle the milk to form the cheese but also infuse the ricotta with a refreshing, citrusy aroma and taste. Always opt for fresh lemons; bottled juice won’t yield the same vibrant flavor.
- **Fresh Basil:** The aromatic herb that perfectly complements the lemon and the milky sweetness of the ricotta. Fresh basil is non-negotiable here; dried basil simply won’t impart the same fresh, herbaceous notes.
- **Salt and Pepper:** Essential for seasoning and bringing out the best in all the flavors. Kosher salt is recommended for its pure taste, and freshly ground black pepper adds a subtle kick.
Beyond the ingredients, there are a couple of pieces of equipment that will make your ricotta-making experience seamless. If you don’t already own them, be sure to add them to your shopping list:
- **Cheesecloth:** This is vital for straining the curds from the whey. Look for good quality, tightly woven cheesecloth, preferably unbleached, which can be found in most grocery stores or kitchen supply shops. You’ll need several layers to prevent the fine curds from escaping.
- **Digital Thermometer with a Clip:** Precision is key when heating milk for cheese making. A digital thermometer that clips to the side of your pot allows for accurate temperature monitoring without constant manual holding, preventing the milk from overheating or not reaching the optimal temperature for curdling.
Step-by-Step Guide to Crafting Your Own Ricotta
The process of making ricotta is surprisingly meditative and enjoyable. Each step contributes to the transformation of liquid milk into a delectable, fresh cheese. Follow these detailed instructions to create your perfect batch:
Step 1: Prepare Your Lemon Juice
Begin by juicing a few fresh lemons. Aim for approximately 2/3 cup of strained lemon juice. The number of lemons needed can vary greatly depending on their size and juiciness, so it’s always wise to purchase a couple extra just in case. After juicing, strain the liquid meticulously to remove any pulp or seeds. This ensures your ricotta remains perfectly smooth and free of unwanted bits.
Step 2: Set Up Your Straining Station
Line a fine-mesh strainer or a colander with several layers of cheesecloth. The goal is to create a secure filter for your curds. Place this lined strainer inside your deepest bowl. The deeper the bowl, the more whey it can collect, preventing overflow during the straining process. This setup will be ready to receive your freshly formed ricotta curds.
Step 3: Heat the Milk
Pour an entire gallon of whole milk into a large stockpot or Dutch oven. Place the pot over medium heat and attach your digital thermometer to the side, ensuring the tip is submerged in the milk but not touching the bottom of the pot. Now comes the patience: you’ll need to gently heat the milk to precisely 185°F (85°C). While the milk heats, stir it frequently and thoroughly. Continuous stirring is critical to prevent the milk from scalding or sticking to the bottom of the pot, which can impart an unpleasant burnt flavor to your finished ricotta.
Step 4: Curdle the Milk
The moment your milk reaches 185°F (85°C), immediately remove the pot from the heat. Without delay, pour in the strained lemon juice. Give it a gentle stir – just one or two swirls to ensure the lemon juice is evenly distributed – and then, this is crucial: DO NOT DISTURB the mixture for a full 25 minutes. This undisturbed waiting period allows the acidity of the lemon juice to work its magic, causing the milk proteins to coagulate and separate into solid curds and liquid whey. This is the magical transformation happening before your eyes, creating the foundation of your ricotta.
Step 5: Strain the Ricotta
Once the 25-minute timer signals, you’ll notice distinct curds floating in a clear, yellowish liquid. It’s time to separate them. Carefully and slowly pour the milk and curds into your prepared cheesecloth-lined strainer. It’s highly recommended to perform this step near a sink, as the bowl beneath the strainer will quickly fill with whey. This allows you to easily drain off the accumulated liquid as needed, preventing spillage.
Step 6: Achieve Your Desired Ricotta Consistency
Once the initial free-flowing whey has drained, you’ll be left with the ricotta curds in the cheesecloth. For a firmer, drier ricotta, gather the edges of the cheesecloth, twist them together, and gently squeeze out additional moisture. Be mindful not to squeeze too aggressively, as this can force some of the finer curds through the cloth. If you prefer a looser, creamier ricotta, simply stop draining when the liquid has ceased flowing freely, leaving more moisture within the curds. The consistency is entirely up to your preference and how you plan to use the ricotta.
Step 7: Flavor Your Ricotta
Transfer the warm, fresh ricotta to a clean mixing bowl. Now it’s time to introduce the vibrant flavors of lemon and basil. Finely mince enough fresh basil leaves to yield about 1/3 cup. Roll the basil leaves tightly before mincing to make this task easier and achieve uniform pieces. Zest half a lemon directly into the bowl, ensuring you only get the bright yellow part of the rind and avoid the bitter white pith. Add a generous pinch of salt and a few grinds of fresh black pepper to taste. Gently fold all the ingredients together until the lemon zest and basil are evenly incorporated throughout the creamy ricotta. Taste and adjust seasoning as necessary, adding more salt or pepper if desired.
Step 8: Chill and Serve
Once flavored, transfer your exquisite lemon basil ricotta to an airtight container with a tight-fitting lid. Refrigerate it for at least 2 hours to allow the flavors to meld and for the ricotta to firm up slightly. For optimal flavor development and texture, chilling it overnight is often preferred. This cooling period is essential for enhancing the overall taste and preparing it for a myriad of culinary applications.
Creative Ways to Enjoy Your Homemade Lemon Basil Ricotta
The versatility of homemade lemon basil ricotta knows no bounds. Once you’ve tasted its fresh, bright flavor, you’ll find endless ways to incorporate it into your meals. Here are just a few ideas to get you started:
- Toast Topper: Simply spread a generous dollop on toasted artisan bread, perhaps drizzled with a touch of extra virgin olive oil and a sprinkle of flaky sea salt. Perfect for breakfast or a light snack.
- Pasta Perfection: Use it as a filling for classic pasta shells, manicotti, or ravioli. It also makes a fantastic light sauce when stirred into warm pasta with a splash of pasta water and some grated Parmesan.
- Savory Tarts & Pizzas: Swirl it onto the base of a savory tart or flatbread before adding other toppings for a creamy, flavorful foundation. It’s particularly good with roasted vegetables.
- Stuffed Chicken or Fish: Create a pocket in chicken breasts or fish fillets, fill with the ricotta mixture, and bake until cooked through.
- Dip or Spread: Serve it as a fresh dip with raw vegetables, crackers, or pita bread.
- Dessert Delight (without basil): For a sweet treat, omit the basil and mix the plain ricotta with a touch of honey or maple syrup and a sprinkle of cinnamon, then serve with fresh berries.
You’ll be amazed at how quickly you’ll go through a batch of this delicious cheese. But the good news is, now you possess the simple knowledge to whip up another batch whenever the craving strikes! Embrace the joy of making fresh, homemade ingredients and elevate your everyday meals. Give this lemon basil ricotta a try – your taste buds will thank you.
Print Recipe
Pin Recipe
Leave a Review »
Homemade Lemon Basil Ricotta
Ingredients
- 1 gallon whole milk
- 1 teaspoon kosher salt
- 2/3 cup lemon juice
- 1/3 cups fresh basil, minced
- 1 teaspoon lemon zest
- 1/3 teaspoons black pepper
Instructions
-
Line a mesh strainer or a colander with a few layers of cheesecloth and set it inside a very deep bowl and set aside.
-
In a large stock pot or Dutch oven, pour in an entire gallon of milk. While you patiently wait for the milk to heat up to 185ºF, stir … stir … stir! It will help prevent the milk from scalding.
-
The moment the milk reaches 185ºF, remove the pot from the heat and pour in the lemon juice. Now we wait, and specifically directed, DO NOT DISTURB for 25 minutes! In this time the lemon juice will coagulate the milk to form the curds, which will be the ricotta!
-
Once timer goes off, pour the milk/ricotta slowly into the cheesecloth-lined strainer. I recommend doing this step by a sink in case you need to drain out some liquid from the bowl.
-
Twist the cheesecloth and squeeze to get the most moisture out. If you want more of a loose ricotta, do not squeeze, just stop draining when the liquid stops flowing freely.
-
Add the ricotta to a mixing bowl and add the minced basil, lemon zest in with the fresh (and still warm) ricotta and mix to incorporate. Season to taste with more salt and some pepper if desired.
-
Transfer the ricotta to a container with a tight fitting lid and refrigerate for 2 hours or overnight.