
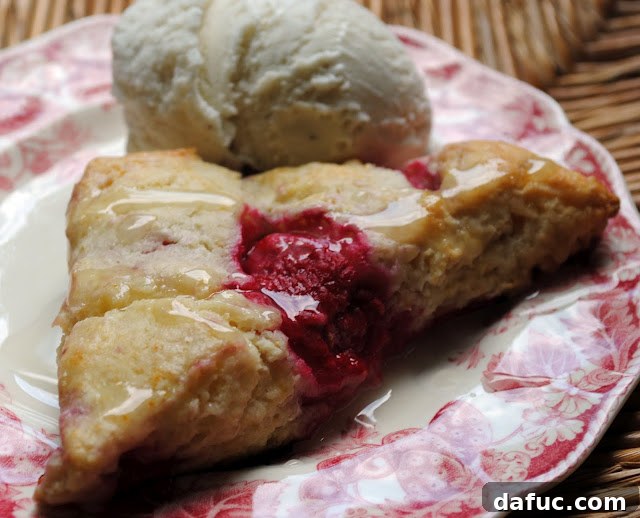
Bright, zesty, and undeniably fresh, these **Raspberry Lemon Scones with a Lemony Glaze** are pure perfection, delivering a burst of sunshine in every bite. Far from the dense, uninspiring treats I once imagined, these homemade scones offer a delightful contrast of tender, flaky interiors studded with juicy raspberries and topped with a sweet, tangy lemon drizzle. This easy-to-follow recipe yields 16 exquisitely balanced scones, making them perfect for a leisurely breakfast, an elegant brunch, or a charming afternoon tea. Get ready to transform your kitchen into a fragrant bakery and discover your new favorite sweet treat!
I must confess, my journey with scones began with a healthy dose of skepticism. For years, the very word “scone” conjured images of dry, brick-like British pastries, a far cry from the light and fluffy baked goods I typically gravitated towards. So, when my best friend enthusiastically emailed me, declaring a sudden craving for scones, my immediate reaction was, “Really? Why on earth would you crave those?” I had firmly categorized them as tough, bland, and utterly unappealing. Despite my reservations, and with the full intention of foisting the entire batch upon her, I agreed to bake some. After all, there was absolutely no way I would actually *like* them, right?
Oh, how wonderfully wrong I was! The moment the sweet, tart aroma of raspberries mingled with the bright scent of lemon began to waft from the oven, something shifted within me. My stomach gave a resounding growl, a surprising reaction to a pastry I had mentally written off. The kitchen was filled with the most tantalizing fragrance, a promise of something truly special that ignited a newfound curiosity. I found myself repeatedly peeking into the oven, silently urging them to bake faster, to be done early, but to my delicious disappointment, they meticulously adhered to their schedule. The anticipation was almost unbearable, transforming my initial skepticism into eager impatience.
The inspiration for these divine **Raspberry Lemon Scones** came from an online quest. I had initially stumbled upon a blueberry scone recipe with a lemon glaze by the acclaimed chef Tyler Florence. While tempting, having recently indulged in lemon-blueberry pancakes, I pondered, “What about raspberries?” The thought of vibrant red raspberries paired with zingy lemon felt irresistibly fresh and summery, a perfect flavor combination that captured the essence of brighter days. This creative pivot led me to a delightful adaptation, tweaking the original to create this perfect raspberry iteration, a recipe that ultimately shattered all my preconceived notions about what a scone could be.
Lemon and raspberries evoke the essence of summer, making these delicate raspberry scones a perfect treat for any sun-drenched day or a delightful pick-me-up.
Crafting the Perfect Raspberry Lemon Scones: Essential Ingredients for a Flaky Delight
Creating these light, tender, and incredibly flavorful **homemade scones** requires a few pantry staples and, crucially, a handful of fresh ingredients. The magic behind a truly flaky scone lies in the quality and temperature of your butter, the freshness of your fruit, and the aromatic zest of a lemon. Here’s a detailed look at what you’ll need to embark on your scone-making adventure, ensuring every bite is a delightful experience:
- All-Purpose Flour: This forms the essential structure of our scones. For the best results, opt for unbleached all-purpose flour.
- Granulated Sugar: We use just enough to sweeten the dough delicately, allowing the natural tartness of the raspberries and brightness of the lemon to shine through.
- Baking Powder: A crucial leavening agent that guarantees a beautiful rise and contributes to the scone’s signature tender, airy crumb.
- Kosher Salt: A small but mighty ingredient, a pinch of kosher salt balances all the flavors, enhancing the sweetness and preventing the scones from tasting flat.
- Cold Unsalted Butter: This is arguably the most vital ingredient for flaky scones. Keeping the butter ice-cold prevents it from melting too quickly into the flour, instead creating pockets of steam during baking that result in distinct, tender layers.
- Heavy Cream: Adds unparalleled richness and essential moisture to the dough, contributing significantly to the luxurious, tender texture of the finished scones. You’ll also need a little extra for brushing the tops before baking, which helps them achieve a beautiful golden hue.
- Fresh Lemon Zest and Juice: The bright, citrusy heart of these **Raspberry Lemon Scones**. The zest is incorporated into the dough for fragrant aroma, while the juice forms the base of our vibrant, tangy glaze.
- Frozen Raspberries: Using frozen raspberries is a smart trick. They are less likely to break apart and bleed their color into the dough during mixing, preserving their vibrant red appearance and preventing your scone dough from turning purple. Plus, they release their juices slowly, keeping the scones moist.
The Art of Baking: A Step-by-Step Guide to Perfect Raspberry Lemon Scones
Baking these **Raspberry Lemon Scones** is a wonderfully rewarding process, and with these clear, detailed instructions, you’ll achieve perfect results every single time. Remember, the secret to truly tender, flaky scones is to work quickly and with a gentle hand, avoiding overmixing the dough.
1. Prepare Your Workspace and Oven: Begin by preheating your oven to a robust 400°F (200°C). A hot oven is crucial for encouraging the scones to rise quickly and achieve that desirable flaky texture. As the oven heats, line a sturdy metal baking sheet with parchment paper. This simple step is a baker’s best friend, preventing sticking and making cleanup an absolute breeze.
2. Combine the Dry Ingredients: In a large mixing bowl, meticulously sift together the all-purpose flour, granulated sugar, baking powder, and kosher salt. Sifting is a small but mighty step here; it not only aerates the flour, making for a lighter scone, but also removes any pesky lumps and ensures all the dry ingredients are uniformly distributed. This uniform distribution is fundamental for proper leavening and consistent flavor throughout your **easy scone recipe**.
3. Infuse with Lemon Zest: Now, grab a fresh, unblemished lemon. Using a microplane or a fine grater, carefully zest the lemon directly into your bowl of dry ingredients. Be extremely mindful to stop when you reach the white pith, which is the bitter layer just beneath the bright yellow zest. The pith can impart an unpleasant, harsh taste, so ensure you only capture the fragrant, oil-rich yellow part. This lemon zest generously infuses the scone dough with a bright, aromatic citrus flavor that beautifully complements the raspberries. Once zested, set the lemon aside; you’ll absolutely need its precious juice later for the irresistible lemony glaze.
4. Cut in the Cold Butter: Next, drop the ice-cold, small-cubed unsalted butter into the dry mixture. The **cold butter technique** is the undeniable secret to achieving wonderfully flaky scones. As the cold butter melts in the hot oven, it creates pockets of steam, which in turn leads to distinct, tender layers within your **homemade scones**. Use a pastry cutter or two forks to quickly blend the butter into the flour. Work efficiently to prevent the butter from warming too much, incorporating it until the mixture resembles coarse, crumbly wet sand with some pea-sized pieces of butter still clearly visible. Avoid overworking, as this can melt the butter and result in tough, dense scones.
5. Add the Wet Ingredients to Form Dough: Form a small well in the absolute center of your flour and butter mixture. This central depression conveniently makes it easier to incorporate the liquid evenly without the risk of overmixing. Pour the heavy cream directly into this well. Heavy cream is key; it adds incredible richness and helps bind the dough together, contributing significantly to the scones’ tender crumb. Using a spoon or your hands, mix just until the wet and dry ingredients are combined and a shaggy, cohesive dough begins to form. Again, resist the strong urge to overmix; a few dry spots are perfectly acceptable and indicate you haven’t developed the gluten too much, ensuring tender results.
6. Gently Fold in the Raspberries: Lastly, carefully and gently fold in the frozen red raspberries. It’s crucial to use frozen raspberries here as they are far less likely to break apart and bleed their vibrant color into the dough, thus preserving the beautiful contrast of bright red berries against the golden scone. Work the berries into the dough with an incredibly light hand, mixing just until they are evenly distributed throughout the mixture. Overmixing at this stage can easily mash the delicate berries, leading to a purple-tinged dough and a less appealing texture.
Gently mix the frozen raspberries into the scone dough, taking utmost care not to mash the delicate berries. This step is key to preserving their integrity and preventing the dough from becoming discolored.
7. Shape and Cut the Dough for Perfect Scones: Lightly flour a clean work surface. Carefully dump the scone dough onto it. With a very gentle touch, avoiding excessive kneading, form the dough into a cohesive rectangle, approximately 12 inches long by 3 inches wide and about 1 1/4 inches thick. Gentle handling is absolutely crucial to maintaining a tender crumb in your finished **Raspberry Lemon Scones**. Next, using a sharp knife, slice the large rectangle in half crosswise (width-wise). Then, cut each of those halves in half again (also width-wise), creating four smaller, uniform rectangles. Now, cut across these four rectangles lengthwise, yielding eight individual squares. Finally, cut each of these eight squares in half diagonally to create 16 classic triangular scone shapes. This precise cutting method ensures uniform size, which is essential for even baking and a beautiful presentation.
8. Prepare for Baking and Golden Perfection: Carefully transfer the newly shaped **raspberry lemon scones** onto your prepared baking sheet, ensuring you leave approximately half an inch of space between each scone. This allows for proper air circulation and expansion during baking. Before sliding them into the oven, brush the tops of each scone with a little extra heavy cream. This simple step creates a beautiful, inviting golden-brown crust and imparts a subtle richness to the surface. Place the baking pan onto the middle rack of your preheated oven and bake for 15-20 minutes, or until the tops are a lovely light golden hue and the vibrant red berries are visibly soft and slightly oozing their delicious juices. The aroma that fills your kitchen will be absolutely intoxicating!
While the irresistible aroma of baking scones filled every corner of the kitchen, a different kind of magic was unfolding right beside me. My youngest daughter, ever the creative spirit, was deeply engrossed in giving her Barbie doll a fabulous makeover. It was a delightful moment, a beautiful testament to the simple joys that fill a home – the comforting scent of fresh baking mingling with the imaginative, carefree play of childhood. And let’s be honest, Barbie, despite a few stray hairs from her zealous styling, always manages to look absolutely fantastic, a true icon of effortless glamour!
The Final Flourish: Creating the Zesty Lemony Glaze for Your Raspberry Lemon Scones
No **Raspberry Lemon Scone** is truly complete without its crowning glory: a silky, tangy **lemony glaze**. This simple yet impactful addition elevates the flavors, providing a perfect counterpoint to the sweet berries and rich scone. You can efficiently prepare this while your scones are baking, ensuring everything is ready to go once they emerge, golden and fragrant, from the oven.
1. Prepare the Glaze Base: Start by sifting the powdered sugar into a medium mixing bowl. Sifting is an often-overlooked but crucial step here; it effectively removes any lumps, guaranteeing a perfectly smooth, velvety glaze without any undesirable grainy texture. This simple preparatory step makes a significant difference in the final consistency and aesthetic appeal of your lemon drizzle.
2. Extract and Strain Lemon Juice: Next, take your fresh lemons and meticulously squeeze out their juice. While the picture might initially show only two lemons, I quickly discovered I actually needed the juice of three lemons to achieve the desired amount of tartness and liquid for a truly perfect glaze. It’s a good reminder that not all lemons yield the same amount of juice! To ensure an impeccably smooth glaze, pour the freshly squeezed lemon juice through a fine-mesh strainer. This crucial step catches any lingering seeds or pulp that might have escaped, leaving you with pure, clear, golden lemon liquid. The invigorating, clean scent of fresh lemons filling your kitchen is truly one of life’s simple, yet profound pleasures, isn’t it?
3. Whisk to Combine: Pour the strained lemon juice into the bowl containing the sifted powdered sugar. Whisk them together vigorously until a smooth, thick, and uniform glaze forms. As you whisk, the refreshing and uplifting aroma of lemons will generously fill your kitchen – a true delight for the senses and a promise of the deliciousness to come.
4. The Secret Ingredient: Butter for a Silky Finish! Now, add a tablespoon of softened unsalted butter to your glaze mixture. You might be momentarily thinking, “Butter? In a glaze? What’s the secret here?” This small, often-surprising addition is, in fact, a complete game-changer! It generously adds a beautiful, subtle sheen, a touch of delightful richness, and most importantly, contributes to that wonderfully smooth, velvety texture that makes this **lemony glaze** so utterly irresistible and professional-looking. Whisk it in until it is fully and seamlessly incorporated into the lemon-sugar mixture.
A Quick Microwave ZAP for Ultimate Perfection:
Before you carefully place the bowl into the microwave, please remember to remove your whisk! Give the glaze a quick zap in the microwave for approximately 30 seconds, just enough to gently warm the mixture and fully melt the butter, ensuring it integrates perfectly. This brief warming period is precisely what transforms the glaze into its ideal, smooth, velvety, and beautifully pourable consistency. Once warmed, give it another quick whisk until it is perfectly uniform and glistening, then set it aside to patiently await the arrival of your warm, fragrant, and freshly baked **Raspberry Lemon Scones**.
After baking for approximately 15-20 minutes, your glorious **Raspberry Lemon Scones** should triumphantly emerge from the oven, their tops a truly beautiful light golden brown. The vibrant red raspberries, now softened and bubbling, will be visibly oozing their sweet juices, a testament to their ripeness and the successful bake. The sight and smell are simply captivating! It was incredibly difficult to choose just one image to capture their utter splendor and deliciousness, so here are four of my absolute favorites! The raspberries look so incredibly bright and appealing against the inviting golden backdrop. Pictures two and three especially capture the essence of these delightful, freshly baked treats!
Serving Suggestions & Creative Ways to Enjoy Your Raspberry Lemon Scones
Once your freshly baked **Raspberry Lemon Scones** have cooled slightly, allowing them to set up perfectly, it’s time for the grand finale: applying that glorious, shimmering **lemony glaze**. The true beauty of this glaze lies in its incredible versatility, allowing you to customize your scone experience to perfectly match your preference and mood.
You have a few fantastic options, each promising a wonderfully delicious outcome:
- The Elegant Drizzle: For a more refined and visually appealing presentation, simply drizzle the glaze artfully over the tops of your scones. This creates delicate, sugary ribbons of citrusy sweetness that cascade gracefully down the sides, offering a perfect, balanced burst of flavor with each sophisticated bite. This method is ideal for a formal tea party or a stylish brunch.
- The Full Coat: If you prefer an even more generous and impactful application, use a small pastry brush to meticulously coat the entire top surface of each scone. This ensures a thick, luscious layer of glaze, intensifying the delightful lemon kick and creating a truly stunning, glossy finish that’s hard to resist. The full coat provides a bolder flavor statement.
- The Indulgent Dunk: For the truly adventurous (and perhaps slightly messy!) **scone** enthusiast, consider the ultimate indulgence: dunking each bite directly into the generous bowl of glaze. This offers a maximum flavor impact and a delightfully tactile, hands-on eating experience. It’s pure, unadulterated joy in every mouthful!
I enthusiastically tried all three methods, and I can confirm with absolute certainty that each option yielded wonderfully delicious results, proving there’s truly no wrong way to enjoy these magnificent treats! Should you, by some miraculous chance, find yourself with any leftover glaze (a truly rare occurrence, I assure you!), do not let a single drop go to waste. Simply refrigerate it in an airtight container, and it can be brilliantly repurposed as a fantastic, tangy syrup for waffles or pancakes the very next morning, adding a zesty twist to your breakfast. The possibilities are truly endless when it comes to savoring the bright, invigorating flavors of these delightful **homemade Raspberry Lemon Scones**!
Enjoy! We absolutely adore seeing your baking creations! If you give this **Raspberry Lemon Scone recipe** a try, please let us know! We’d love for you to snap a photo and tag us on Twitter or Instagram! Your culinary adventures truly inspire us and our community!

Print Recipe
Pin Recipe
Leave a Review »
Raspberry Lemon Scones with a Lemony Glaze
Ingredients
FOR THE SCONES:
- 2 cups unbleached all-purpose flour
- 1 tablespoon baking powder
- 1/2 teaspoon kosher salt
- 2 tablespoons granulated sugar
- 5 tablespoons cold unsalted butter, cut into small cubes
- 1 cup heavy cream, plus more for brushing the scones.
- 1 cup frozen fresh raspberries
- 1 large lemon, zested (for the scones) and juiced (for the glaze, you might need more lemons)
FOR THE LEMON GLAZE:
- 1/2 cup fresh lemon juice, strained (from approx. 2-3 lemons)
- 2 cups powdered sugar, sifted
- 1 tablespoon unsalted butter, softened
Instructions
MAKE THE SCONES:
-
Preheat your oven to 400°F (200°C) and line a rimmed metal baking sheet with parchment paper.
-
In a large bowl, sift together the unbleached all-purpose flour, baking powder, kosher salt, granulated sugar, and the zest of one lemon. Whisk briefly to combine these dry ingredients evenly.
-
Add the cold, cubed butter to the dry ingredients. Using a pastry cutter (or two forks), blend the butter into the flour mixture until it resembles wet, crumbly sand with some pea-sized pieces of butter remaining. Work quickly to keep the butter cold.
-
Form a well in the center of the flour mixture. Pour in the heavy cream. Mix gently with a spoon or your hands just until combined and a shaggy dough forms. Be careful not to overwork the dough.
-
Gently fold in the frozen raspberries. Work quickly and with a light hand to avoid mashing or breaking the berries, which could discolor the dough.
-
Transfer the dough onto a lightly floured surface. Gently press and shape the dough into a rectangle approximately 12 inches long by 3 inches wide and about 1 1/4 inches thick.
-
Using a sharp knife, cut the rectangle in half crosswise. Then cut each of those halves in half again (width-wise), forming 4 smaller rectangles. Next, cut across the 4 rectangles lengthwise, creating 8 squares.
-
Cut each of the 8 squares in half diagonally. This will yield 16 classic triangular scone shapes.
-
Carefully transfer the scones to the prepared baking sheet, spacing them about half an inch apart. Brush the tops of the scones with a little extra heavy cream. Bake for 15-18 minutes, or until the tops are light golden brown and the berries are soft and slightly oozing. Let the scones cool slightly on the baking sheet before transferring to a wire rack to cool further, then apply the glaze.
MAKE THE LEMON GLAZE:
-
In a medium bowl, sift the powdered sugar. Whisk in the strained lemon juice until smooth.
-
Add the softened unsalted butter and whisk until fully incorporated. For a smoother, more pourable glaze, remove the whisk and microwave the mixture for about 30 seconds until warm.
-
Whisk again until the glaze is perfectly smooth and velvety. Set aside until the scones are slightly cooled.
-
Once the scones are slightly cooled, drizzle, brush, or dip them into the prepared lemon glaze. Serve immediately and enjoy!